
제안된 Portals API로 탐색 UX를 개선하는 방법을 알아보세요.

페이지가 빠르게 로드되는지 확인하는 것이 우수한 사용자 환경을 제공하는 데 중요합니다. 하지만 페이지 전환, 즉 사용자가 페이지 간에 이동할 때 보이는 부분은 종종 간과됩니다.
포털이라는 새로운 웹 플랫폼 API 제안은 사용자가 사이트를 탐색할 때 환경을 간소화하여 이를 지원하는 것을 목표로 합니다.
포털 작동 방식 보기
포털에서 사용 설정되는 기능
싱글 페이지 애플리케이션 (SPA)은 멋진 전환을 제공하지만 빌드의 복잡성이 높아집니다. 멀티페이지 애플리케이션 (MPA)은 빌드하기가 훨씬 쉽지만 페이지 간에 빈 화면이 표시됩니다.
포털은 MPA의 낮은 복잡성과 SPA의 원활한 전환이라는 두 가지 장점을 모두 제공합니다.
삽입을 허용한다는 점에서 <iframe>와 비슷하지만 <iframe>와 달리 콘텐츠로 이동하는 기능도 제공됩니다.
눈으로 확인해 보세요. 먼저 Chrome Dev Summit 2018에서 선보인 내용을 확인해 보세요.
기존 탐색을 사용하면 브라우저가 대상 렌더링을 완료할 때까지 사용자는 빈 화면으로 기다려야 합니다.
포털을 사용하면 사용자가 애니메이션을 경험하는 동안 <portal>가 콘텐츠를 미리 렌더링하고 원활한 탐색 환경을 만듭니다.
포털 이전에는 <iframe>를 사용하여 다른 페이지를 렌더링할 수 있었습니다. 페이지에서 프레임을 이동하는 애니메이션을 추가할 수도 있습니다. 하지만 <iframe>를 사용하면 콘텐츠로 이동할 수 없습니다. 포털은 이러한 격차를 해소하여 흥미로운 사용 사례를 지원합니다.
포털 사용해 보기
about://flags를 통해 사용 설정
실험 플래그를 전환하여 Chrome 85 이상 버전에서 포털을 사용해 보세요.
- 동일한 출처 탐색에
about://flags/#enable-portals플래그를 사용 설정합니다. - 교차 출처 탐색을 테스트하려면
about://flags/#enable-portals-cross-origin플래그도 사용 설정하세요.
포털 실험의 초기 단계에서는 --user-data-dir 명령줄 플래그를 설정하여 테스트에 완전히 별개의 사용자 데이터 디렉터리를 사용하는 것이 좋습니다.
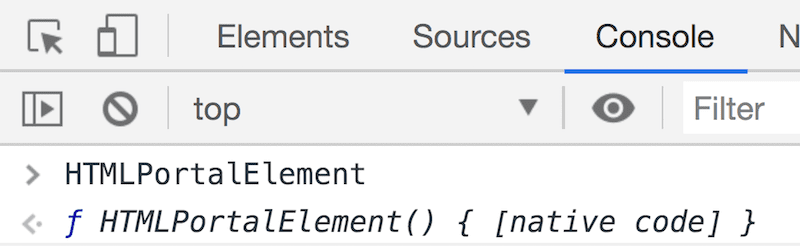
포털이 사용 설정되면 DevTools에서 새롭게 반짝이는 HTMLPortalElement가 있는지 확인합니다.
포털 구현
기본 구현 예를 살펴보겠습니다.
// Create a portal with the wikipedia page, and embed it
// (like an iframe). You can also use the <portal> tag instead.
portal = document.createElement('portal');
portal.src = 'https://en.wikipedia.org/wiki/World_Wide_Web';
portal.style = '...';
document.body.appendChild(portal);

// When the user touches the preview (embedded portal):
// do fancy animation, e.g. expand …
// and finish by doing the actual transition.
// For the sake of simplicity, this snippet will navigate
// on the `onload` event of the Portals element.
portal.addEventListener('load', (evt) => {
   portal.activate();
});
간단한 작업입니다. DevTools 콘솔에서 이 코드를 사용해 보세요. 위키피디아 페이지가 열립니다.
Chrome 개발자 서밋에서 보여준 것처럼 위의 데모와 똑같이 작동하는 앱을 빌드하려면 다음 스니펫을 참고하세요.
// Adding some styles with transitions
const style = document.createElement('style');
style.innerHTML = `
  portal {
    position:fixed;
    width: 100%;
    height: 100%;
    opacity: 0;
    box-shadow: 0 0 20px 10px #999;
    transform: scale(0.4);
    transform-origin: bottom left;
    bottom: 20px;
    left: 20px;
    animation-name: fade-in;
    animation-duration: 1s;
    animation-delay: 2s;
    animation-fill-mode: forwards;
  }
  .portal-transition {
    transition: transform 0.4s;
  }
  @media (prefers-reduced-motion: reduce) {
    .portal-transition {
      transition: transform 0.001s;
    }
  }
  .portal-reveal {
    transform: scale(1.0) translateX(-20px) translateY(20px);
  }
  @keyframes fade-in {
    0%   { opacity: 0; }
    100% { opacity: 1; }
  }
`;
const portal = document.createElement('portal');
// Let's navigate into the WICG Portals spec page
portal.src = 'https://wicg.github.io/portals/';
// Add a class that defines the transition. Consider using
// `prefers-reduced-motion` media query to control the animation.
// https://developers.google.com/web/updates/2019/03/prefers-reduced-motion
portal.classList.add('portal-transition');
portal.addEventListener('click', (evt) => {
  // Animate the portal once user interacts
  portal.classList.add('portal-reveal');
});
portal.addEventListener('transitionend', (evt) => {
  if (evt.propertyName == 'transform') {
    // Activate the portal once the transition has completed
    portal.activate();
  }
});
document.body.append(style, portal);
포털을 사용하여 기능 감지를 쉽게 수행하여 웹사이트를 점진적으로 개선할 수도 있습니다.
if ('HTMLPortalElement' in window) {
  // If this is a platform that have Portals...
  const portal = document.createElement('portal');
  ...
}
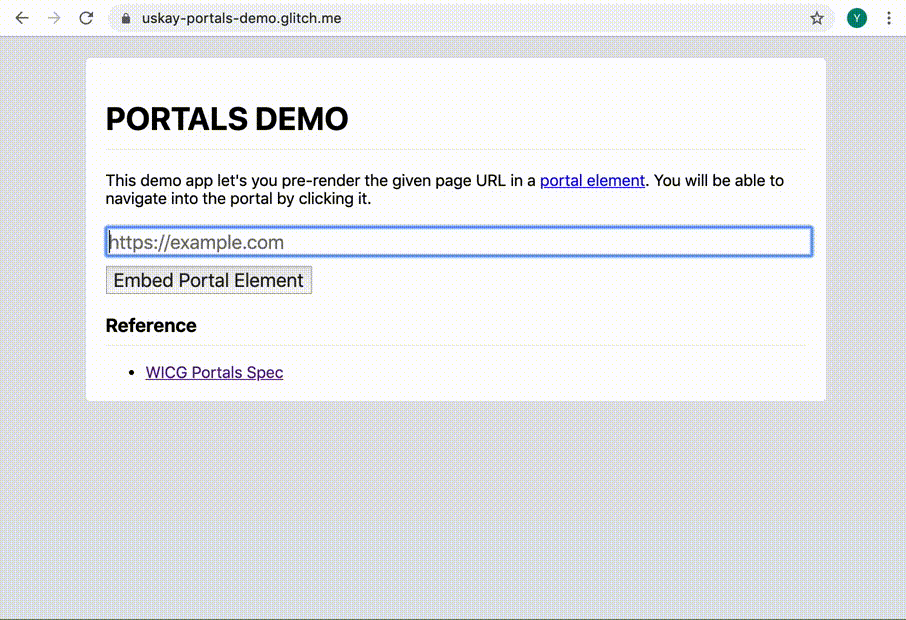
포털의 사용 환경을 빠르게 경험하려면 uskay-portals-demo.glitch.me을 사용해 보세요. Chrome 85 이상 버전으로 액세스하고 실험용 플래그를 사용 설정해야 합니다.
- 미리보려는 URL을 입력합니다.
- 그러면 페이지가
<portal>요소로 삽입됩니다. - 미리보기를 클릭합니다.
- 미리보기는 애니메이션 후에 활성화됩니다.
사양 확인하기
웹 인큐베이션 커뮤니티 그룹 (WICG)에서 포털 사양을 적극적으로 논의하고 있습니다. 빠르게 시작하려면 몇 가지 주요 시나리오를 살펴보세요. 다음은 숙지해야 할 세 가지 중요한 기능입니다.
<portal>요소: HTML 요소 자체입니다. API는 매우 간단합니다.src속성,activate함수, 메시지 전송을 위한 인터페이스 (postMessage)로 구성됩니다.activate는 활성화 시<portal>에 데이터를 전달하는 선택적 인수를 사용합니다.portalHost인터페이스:window객체에portalHost객체를 추가합니다. 이렇게 하면 페이지가<portal>요소로 삽입되었는지 확인할 수 있습니다. 또한 호스트로 다시 메시지를 보낼 수 있는 인터페이스 (postMessage)를 제공합니다.- PortalActivateEvent 인터페이스:
<portal>가 활성화될 때 실행되는 이벤트입니다. 이전 페이지를<portal>요소로 검색하는 데 사용할 수 있는adoptPredecessor라는 멋진 함수가 있습니다. 이를 통해 두 페이지 간에 원활한 탐색과 구성된 환경을 만들 수 있습니다.
기본 사용 패턴을 넘어서 살펴보겠습니다. 다음은 포털로 할 수 있는 작업의 일부 목록과 샘플 코드입니다.
<portal> 요소로 삽입될 때 스타일 맞춤설정
// Detect whether this page is hosted in a portal
if (window.portalHost) {
  // Customize the UI when being embedded as a portal
}
<portal> 요소와 portalHost 간의 메시지
// Send message to the portal element
const portal = document.querySelector('portal');
portal.postMessage({someKey: someValue}, ORIGIN);

// Receive message via window.portalHost
window.portalHost.addEventListener('message', (evt) => {
  const data = evt.data.someKey;
  // handle the event
});
<portal> 요소 활성화 및 portalactivate 이벤트 수신
// You can optionally add data to the argument of the activate function
portal.activate({data: {somekey: 'somevalue'}});

// The portal content will receive the portalactivate event
// when the activate happens
window.addEventListener('portalactivate', (evt) => {
  // Data available as evt.data
  const data = evt.data;
});
전신 검색
// Listen to the portalactivate event
window.addEventListener('portalactivate', (evt) => {
  // ... and creatively use the predecessor
  const portal = evt.adoptPredecessor();
  document.querySelector('someElm').appendChild(portal);
});
페이지가 이전 페이지로 채택되었는지 여부 확인
// The activate function returns a Promise.
// When the promise resolves, it means that the portal has been activated.
// If this document was adopted by it, then window.portalHost will exist.
portal.activate().then(() => {
  // Check if this document was adopted into a portal element.
  if (window.portalHost) {
    // You can start communicating with the portal element
    // i.e. listen to messages
    window.portalHost.addEventListener('message', (evt) => {
      // handle the event
    });
  }
});
포털에서 지원하는 모든 기능을 결합하면 매우 멋진 사용자 환경을 구축할 수 있습니다. 예를 들어 아래 데모는 포털이 웹사이트와 서드 파티 삽입 콘텐츠 간에 원활한 사용자 환경을 지원하는 방법을 보여줍니다.
사용 사례 및 계획
포털에 대한 간단한 둘러보기가 도움이 되었기를 바랍니다. 여러분의 다음 행보도 기대하며 응원하겠습니다. 예를 들어 제품 카테고리 등록정보 페이지에서 베스트셀러 제품의 페이지를 미리 렌더링하는 등 간단하지 않은 탐색에 포털을 사용해 보세요.
포털은 <iframe>와 마찬가지로 교차 출처 탐색에 사용할 수 있다는 점도 중요합니다. 따라서 서로 교차 참조하는 웹사이트가 여러 개인 경우 포털을 사용하여 두 웹사이트 간에 원활한 탐색을 만들 수도 있습니다. 이 교차 출처 사용 사례는 포털에만 해당하며 SPA의 사용자 환경을 개선할 수도 있습니다.
의견 보내기
Chrome 85 및 이후 버전에서는 포털을 실험할 수 있습니다. 커뮤니티의 의견은 새 API 설계에 매우 중요하므로 사용해 보고 의견을 알려주세요. 기능 요청이나 의견이 있으면 WICG GitHub 저장소로 이동하세요.