
はじめに
この記事では、JSARToolKit ライブラリと WebRTC getUserMedia API を使用して、ウェブで拡張現実アプリケーションを実行する方法について説明します。レンダリングには、パフォーマンスの向上により WebGL を使用しています。この記事の最終的な結果は、ウェブカメラ動画の拡張現実マーカーの上に 3D モデルを配置するデモ アプリケーションです。
JSARToolKit は、JavaScript 用の拡張現実ライブラリです。これは GPL でリリースされたオープンソース ライブラリで、Mozilla のRemixing Reality デモ用に作成した Flash の FLARToolKit の直接ポートです。FLARToolKit 自体は、Java の NyARToolKit のポートであり、これは C の ARToolKit のポートです。長い道のりでしたが、ついに実現しました。
JSARToolKit はキャンバス要素を操作します。キャンバスから画像を読み取る必要があるため、画像はページと同じオリジンから取得する必要があります。または、CORS を使用して同一オリジン ポリシーを回避する必要があります。要するに、テクスチャとして使用する画像要素または動画要素の crossOrigin プロパティを '' または 'anonymous' に設定します。
分析のためにキャンバスを JSARToolKit に渡すと、JSARToolKit は画像で検出された AR マーカーのリストと、対応する変換行列を返します。マーカーの上に 3D オブジェクトを描画するには、変換行列を、使用している 3D レンダリング ライブラリに渡して、オブジェクトが行列を使用して変換されるようにします。次に、WebGL シーンに動画フレームを描画し、その上にオブジェクトを描画します。これで準備は完了です。
JSARToolKit を使用して動画を分析するには、動画をキャンバスに描画してから、キャンバスを JSARToolKit に渡します。これをすべてのフレームに対して行えば、動画 AR トラッキングが完成します。JSARToolKit は最新の JavaScript エンジンで十分高速であるため、640x480 の動画フレームでもリアルタイムで処理できます。ただし、動画フレームが大きいほど、処理に時間がかかります。動画フレームのサイズは 320x240 が適していますが、小さなマーカーや複数のマーカーを使用する場合は 640x480 が適しています。
デモ
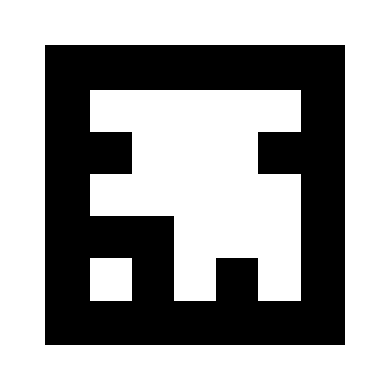
ウェブカメラのデモを表示するには、ブラウザで WebRTC を有効にする必要があります(Chrome の場合は、about:flags に移動して MediaStream を有効にします)。また、以下の AR マーカーも印刷する必要があります。スマートフォンやタブレットでマーカー画像を開き、ウェブカメラに映していただく方法も試してみてください。
JSARToolKit の設定
JSARToolKit API は Java に似ているため、使用するには工夫が必要です。基本的な考え方は、ラスター オブジェクトに対して動作する検出オブジェクトがあることです。検出機能とラスターの間には、ラスター座標をカメラ座標に変換するカメラ パラメータ オブジェクトがあります。検出されたマーカーを検出機能から取得するには、マーカーを反復処理し、その変換行列をコードにコピーします。
最初のステップは、ラスター オブジェクト、カメラ パラメータ オブジェクト、検出オブジェクトを作成することです。
// Create a RGB raster object for the 2D canvas.
// JSARToolKit uses raster objects to read image data.
// Note that you need to set canvas.changed = true on every frame.
var raster = new NyARRgbRaster_Canvas2D(canvas);

// FLARParam is the thing used by FLARToolKit to set camera parameters.
// Here we create a FLARParam for images with 320x240 pixel dimensions.
var param = new FLARParam(320, 240);

// The FLARMultiIdMarkerDetector is the actual detection engine for marker detection.
// It detects multiple ID markers. ID markers are special markers that encode a number.
var detector = new FLARMultiIdMarkerDetector(param, 120);

// For tracking video set continue mode to true. In continue mode, the detector
// tracks markers across multiple frames.
detector.setContinueMode(true);

// Copy the camera perspective matrix from the FLARParam to the WebGL library camera matrix.
// The second and third parameters determine the zNear and zFar planes for the perspective matrix.
param.copyCameraMatrix(display.camera.perspectiveMatrix, 10, 10000);
getUserMedia を使用してウェブカメラにアクセスする
次に、WebRTC API を介してウェブカメラの動画を受信する動画要素を作成します。事前に録画された動画の場合は、動画のソース属性を動画の URL に設定するだけです。静止画像からマーカーを検出する場合は、ほぼ同じ方法で image 要素を使用できます。
WebRTC と getUserMedia はまだ新しい技術であるため、機能検出を行う必要があります。詳しくは、Eric Bidelman による HTML5 で音声と動画をキャプチャするをご覧ください。
var video = document.createElement('video');
video.width = 320;
video.height = 240;

var getUserMedia = function(t, onsuccess, onerror) {
  if (navigator.getUserMedia) {
    return navigator.getUserMedia(t, onsuccess, onerror);
  } else if (navigator.webkitGetUserMedia) {
    return navigator.webkitGetUserMedia(t, onsuccess, onerror);
  } else if (navigator.mozGetUserMedia) {
    return navigator.mozGetUserMedia(t, onsuccess, onerror);
  } else if (navigator.msGetUserMedia) {
    return navigator.msGetUserMedia(t, onsuccess, onerror);
  } else {
    onerror(new Error("No getUserMedia implementation found."));
  }
};

var URL = window.URL || window.webkitURL;
var createObjectURL = URL.createObjectURL || webkitURL.createObjectURL;
if (!createObjectURL) {
  throw new Error("URL.createObjectURL not found.");
}

getUserMedia({'video': true},
  function(stream) {
    var url = createObjectURL(stream);
    video.src = url;
  },
  function(error) {
    alert("Couldn't access webcam.");
  }
);
マーカーの検出
検出機能が正常に動作したら、画像を入力して AR マトリックスを検出できます。まず、ラスター オブジェクト キャンバスに画像を描画してから、ラスター オブジェクトで検出を行います。検出機能は、画像で検出されたマーカーの数を返します。
// Draw the video frame to the raster canvas, scaled to 320x240.
canvas.getContext('2d').drawImage(video, 0, 0, 320, 240);

// Tell the raster object that the underlying canvas has changed.
canvas.changed = true;

// Do marker detection by using the detector object on the raster object.
// The threshold parameter determines the threshold value
// for turning the video frame into a 1-bit black-and-white image.
//
var markerCount = detector.detectMarkerLite(raster, threshold);
最後のステップは、検出されたマーカーを反復処理して、その変換行列を取得することです。変換行列は、3D オブジェクトをマーカーの上に配置するために使用します。
// Create a NyARTransMatResult object for getting the marker translation matrices.
var resultMat = new NyARTransMatResult();
var markers = {};
// Go through the detected markers and get their IDs and transformation matrices.
for (var idx = 0; idx < markerCount; idx++) {
// Get the ID marker data for the current marker.
// ID markers are special kind of markers that encode a number.
// The bytes for the number are in the ID marker data.
var id = detector.getIdMarkerData(idx);
// Read bytes from the id packet.
var currId = -1;
// This code handles only 32-bit numbers or shorter.
if (id.packetLength <= 4) {
currId = 0;
for (var i = 0; i < id.packetLength; i++) {
currId = (currId << 8) | id.getPacketData(i);
}
}
// If this is a new id, let's start tracking it.
if (markers[currId] == null) {
markers[currId] = {};
}
// Get the transformation matrix for the detected marker.
detector.getTransformMatrix(idx, resultMat);
// Copy the result matrix into our marker tracker object.
markers[currId].transform = Object.asCopy(resultMat);
}
マトリックス マッピング
JSARToolKit 行列を glMatrix 行列(最後の 4 要素に移動列がある 16 要素の FloatArrays)にコピーするコードは次のとおりです。魔法のように動作します(つまり、ARToolKit のマトリックスの設定方法はわかりません。Y 軸が反転していると思われます)。とにかく、この符号反転の魔法によって、JSARToolKit 行列は glMatrix と同じように動作します。
このライブラリを Three.js などの別のライブラリで使用するには、ARToolKit 行列をライブラリの行列形式に変換する関数を作成する必要があります。また、FLARParam.copyCameraMatrix メソッドにフックする必要があります。copyCameraMatrix メソッドは、FLARParam の遠近感マトリックスを glMatrix スタイルのマトリックスに書き込みます。
function copyMarkerMatrix(arMat, glMat) {
  glMat[0] = arMat.m00;
  glMat[1] = -arMat.m10;
  glMat[2] = arMat.m20;
  glMat[3] = 0;
  glMat[4] = arMat.m01;
  glMat[5] = -arMat.m11;
  glMat[6] = arMat.m21;
  glMat[7] = 0;
  glMat[8] = -arMat.m02;
  glMat[9] = arMat.m12;
  glMat[10] = -arMat.m22;
  glMat[11] = 0;
  glMat[12] = arMat.m03;
  glMat[13] = -arMat.m13;
  glMat[14] = arMat.m23;
  glMat[15] = 1;
}
Three.js の統合
Three.js は、一般的な JavaScript 3D エンジンです。ここでは、Three.js で JSARToolKit の出力を使用する方法について説明します。必要なものは 3 つあります。動画画像が描画された全画面四角形、FLARParam の遠近感行列を持つカメラ、マーカー行列を変換として持つオブジェクトです。以下のコードで、統合手順を説明します。
// I'm going to use a glMatrix-style matrix as an intermediary.
// So the first step is to create a function to convert a glMatrix matrix into a Three.js Matrix4.
THREE.Matrix4.prototype.setFromArray = function(m) {
  return this.set(
    m[0], m[4], m[8], m[12],
    m[1], m[5], m[9], m[13],
    m[2], m[6], m[10], m[14],
    m[3], m[7], m[11], m[15]
  );
};

// glMatrix matrices are flat arrays.
var tmp = new Float32Array(16);

// Create a camera and a marker root object for your Three.js scene.
var camera = new THREE.Camera();
scene.add(camera);

var markerRoot = new THREE.Object3D();
markerRoot.matrixAutoUpdate = false;

// Add the marker models and suchlike into your marker root object.
var cube = new THREE.Mesh(
  new THREE.CubeGeometry(100,100,100),
  new THREE.MeshBasicMaterial({color: 0xff00ff})
);
cube.position.z = -50;
markerRoot.add(cube);

// Add the marker root to your scene.
scene.add(markerRoot);

// Next we need to make the Three.js camera use the FLARParam matrix.
param.copyCameraMatrix(tmp, 10, 10000);
camera.projectionMatrix.setFromArray(tmp);


// To display the video, first create a texture from it.
var videoTex = new THREE.Texture(videoCanvas);

// Then create a plane textured with the video.
var plane = new THREE.Mesh(
  new THREE.PlaneGeometry(2, 2, 0),
  new THREE.MeshBasicMaterial({map: videoTex})
);

// The video plane shouldn't care about the z-buffer.
plane.material.depthTest = false;
plane.material.depthWrite = false;

// Create a camera and a scene for the video plane and
// add the camera and the video plane to the scene.
var videoCam = new THREE.Camera();
var videoScene = new THREE.Scene();
videoScene.add(plane);
videoScene.add(videoCam);

...

// On every frame do the following:
function tick() {
  // Draw the video frame to the canvas.
  videoCanvas.getContext('2d').drawImage(video, 0, 0);
  canvas.getContext('2d').drawImage(videoCanvas, 0, 0, canvas.width, canvas.height);

  // Tell JSARToolKit that the canvas has changed.
  canvas.changed = true;

  // Update the video texture.
  videoTex.needsUpdate = true;

  // Detect the markers in the video frame.
  var markerCount = detector.detectMarkerLite(raster, threshold);
  for (var i=0; i<markerCount; i++) {
    // Get the marker matrix into the result matrix.
    detector.getTransformMatrix(i, resultMat);

    // Copy the marker matrix to the tmp matrix.
    copyMarkerMatrix(resultMat, tmp);

    // Copy the marker matrix over to your marker root object.
    markerRoot.matrix.setFromArray(tmp);
  }

  // Render the scene.
  renderer.autoClear = false;
  renderer.clear();
  renderer.render(videoScene, videoCam);
  renderer.render(scene, camera);
}
概要
この記事では、JSARToolKit の基本について説明しました。これで、JavaScript を使用して独自のウェブカメラを使用した拡張現実アプリケーションを作成できるようになりました。
JSARToolKit と Three.js を統合するのは少し面倒ですが、可能です。デモで正しく行っているかどうかは 100% 確信が持てませんので、より良い方法をご存じでしたらお知らせください。パッチをお待ちしております。