

簡介
媒體來源擴充功能 (MSE) 可為 HTML5 <audio> 和 <video> 元素提供擴充緩衝和播放控制功能。雖然最初是為了簡化基於 HTTP 的動態自動調整串流 (DASH) 影片播放器而開發,但我們將在下文瞭解如何將其用於音訊,特別是無間隙播放。
你可能聽過音樂專輯,其中歌曲在曲目間流暢銜接,甚至可能正在聆聽這類專輯。藝人會基於藝術考量,以及黑膠唱片和CD 的特性 (音訊會以連續串流的形式寫入),創作這些無間隙播放體驗。遺憾的是,由於 MP3 和 AAC 等現代音訊轉碼器運作方式的緣故,現在通常無法提供這種無縫的聽覺體驗。
我們會在下文詳細說明原因,但現在先從示範開始。以下是精彩的《Sintel》前 30 秒片段,已切分成五個 MP3 檔案,並使用 MSE 重新組合。紅線表示在建立 (編碼) 各個 MP3 時導入的間隙,您會在這些點聽到故障。
噁!這不是理想的體驗,我們能做得更好。只要多花一點時間,使用上述示範中的相同 MP3 檔案,我們就能使用 MSE 移除這些惱人的間隙。下一個示範中的綠線表示檔案已合併,且間隙已移除。在 Chrome 38 以上版本中,這項功能可順暢播放影片!
建立無間斷內容的方法有很多種。為了進行這項示範,我們將著重於一般使用者可能擁有的檔案類型。每個檔案都經過個別編碼,不考慮前後的音訊片段。
基本設定
首先,讓我們回到基本設定,瞭解如何設定 MediaSource 執行個體。
顧名思義,媒體來源擴充功能只是現有媒體元素的擴充功能。在下方,我們將 Object URL (代表 MediaSource 執行個體) 指派給音訊元素的來源屬性,就像設定標準網址一樣。
var audio = document.createElement('audio');
var mediaSource = new MediaSource();
var SEGMENTS = 5;

mediaSource.addEventListener('sourceopen', function () {
  var sourceBuffer = mediaSource.addSourceBuffer('audio/mpeg');

  function onAudioLoaded(data, index) {
    // Append the ArrayBuffer data into our new SourceBuffer.
    sourceBuffer.appendBuffer(data);
  }

  // Retrieve an audio segment via XHR.  For simplicity, we're retrieving the
  // entire segment at once, but we could also retrieve it in chunks and append
  // each chunk separately.  MSE will take care of assembling the pieces.
  GET('sintel/sintel_0.mp3', function (data) {
    onAudioLoaded(data, 0);
  });
});

audio.src = URL.createObjectURL(mediaSource);
MediaSource 物件連線後,會執行一些初始化作業,並最終觸發 sourceopen 事件;此時我們就可以建立 SourceBuffer。在上述範例中,我們建立的 audio/mpeg 能夠剖析及解碼 MP3 片段;此外,還有其他幾種類型可供使用。
異常波形
我們稍後會再回到程式碼,但現在先仔細看看剛附加的檔案,特別是檔案結尾。下圖是過去 3000 個樣本的平均值,取自 sintel_0.mp3 軌的兩個聲道。紅線上的每個像素都是 浮點樣本,範圍為 [-1.0, 1.0]。

為什麼會有這麼多零 (靜音) 樣本?這些問題實際上是編碼時產生的壓縮失真。幾乎每個編碼器都會導入某種類型的填補。在本例中,LAME 在檔案結尾新增了 576 個填充樣本。
除了結尾的邊框間距外,每個檔案的開頭也新增了邊框間距。如果我們預先查看sintel_1.mp3
音軌,會發現前面有另外 576 個填充樣本。不同編碼器和內容的填補量各不相同,但我們可根據每個檔案中包含的 metadata 判斷確切值。
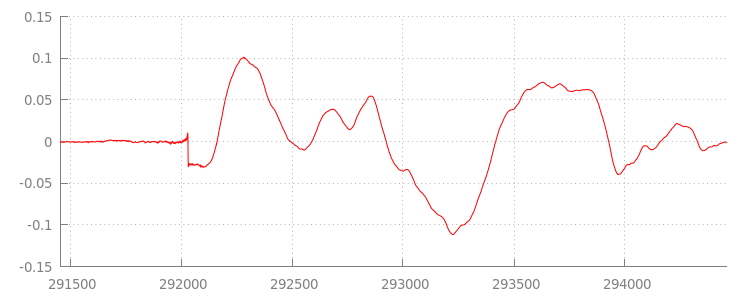
每個檔案開頭和結尾的無聲片段,是造成先前試聽中片段之間故障的原因。如要實現無間隙播放,我們必須移除這些無聲片段。幸好,您可以使用 MediaSource 輕鬆完成這項操作。下文將修改 onAudioLoaded() 方法,使用附加視窗和時間戳記偏移來移除這段靜音。
程式碼範例
function onAudioLoaded(data, index) {
  // Parsing gapless metadata is unfortunately non trivial and a bit messy, so
  // we'll glaze over it here; see the appendix for details.
  // ParseGaplessData() will return a dictionary with two elements:
  //
  //    audioDuration: Duration in seconds of all non-padding audio.
  //    frontPaddingDuration: Duration in seconds of the front padding.
  //
  var gaplessMetadata = ParseGaplessData(data);

  // Each appended segment must be appended relative to the next.  To avoid any
  // overlaps, we'll use the end timestamp of the last append as the starting
  // point for our next append or zero if we haven't appended anything yet.
  var appendTime = index > 0 ? sourceBuffer.buffered.end(0) : 0;

  // Simply put, an append window allows you to trim off audio (or video) frames
  // which fall outside of a specified time range.  Here, we'll use the end of
  // our last append as the start of our append window and the end of the real
  // audio data for this segment as the end of our append window.
  sourceBuffer.appendWindowStart = appendTime;
  sourceBuffer.appendWindowEnd = appendTime + gaplessMetadata.audioDuration;

  // The timestampOffset field essentially tells MediaSource where in the media
  // timeline the data given to appendBuffer() should be placed.  I.e., if the
  // timestampOffset is 1 second, the appended data will start 1 second into
  // playback.
  //
  // MediaSource requires that the media timeline starts from time zero, so we
  // need to ensure that the data left after filtering by the append window
  // starts at time zero.  We'll do this by shifting all of the padding we want
  // to discard before our append time (and thus, before our append window).
  sourceBuffer.timestampOffset =
    appendTime - gaplessMetadata.frontPaddingDuration;

  // When appendBuffer() completes, it will fire an updateend event signaling
  // that it's okay to append another segment of media.  Here, we'll chain the
  // append for the next segment to the completion of our current append.
  if (index == 0) {
    sourceBuffer.addEventListener('updateend', function () {
      if (++index < SEGMENTS) {
        GET('sintel/sintel_' + index + '.mp3', function (data) {
          onAudioLoaded(data, index);
        });
      } else {
        // We've loaded all available segments, so tell MediaSource there are no
        // more buffers which will be appended.
        mediaSource.endOfStream();
        URL.revokeObjectURL(audio.src);
      }
    });
  }

  // appendBuffer() will now use the timestamp offset and append window settings
  // to filter and timestamp the data we're appending.
  //
  // Note: While this demo uses very little memory, more complex use cases need
  // to be careful about memory usage or garbage collection may remove ranges of
  // media in unexpected places.
  sourceBuffer.appendBuffer(data);
}
無縫波形
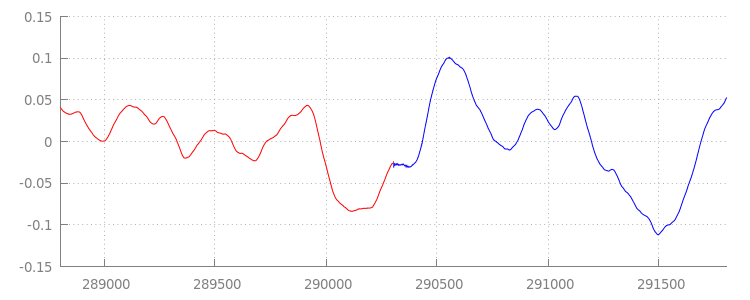
我們再次查看套用附加視窗後的波形,看看新程式碼的成果。如下所示,結尾的靜音部分 (以紅色標示) 和開頭的靜音部分 (以藍色標示) 都已移除,因此片段之間的轉換更加流暢。sintel_0.mp3sintel_1.mp3
結論
這樣一來,我們就將所有五個片段順暢地縫合為一個,示範也到此結束。在繼續之前,您可能已注意到我們的 onAudioLoaded() 方法並未考量容器或轉碼器。也就是說,無論容器或轉碼器類型為何,這些技術都適用。下方可重新播放原始的 DASH 就緒片段化 MP4,而非 MP3。
如要進一步瞭解無間斷內容製作和中繼資料剖析,請參閱下方的附錄。您也可以探索gapless.js,進一步瞭解支援這項示範的程式碼。
感謝您閱讀本信!
附錄 A:建立無間斷內容
要正確建立無間斷內容並不容易。下文將逐步說明如何建立本示範中使用的 Sintel 媒體。首先,您需要 Sintel 的無損 FLAC 原聲帶副本;為求長久保存,下方也附上 SHA1。工具方面,您需要 FFmpeg、MP4Box、LAME,以及安裝 afconvert 的 OSX。
    unzip Jan_Morgenstern-Sintel-FLAC.zip
    sha1sum 1-Snow_Fight.flac
    # 0535ca207ccba70d538f7324916a3f1a3d550194  1-Snow_Fight.flac
首先,我們將 1-Snow_Fight.flac 音軌的前 31.5 秒分割出來。我們也想在 28 秒後加入 2.5 秒的淡出效果,避免在播放完畢後發生點擊。使用下列 FFmpeg 指令列,即可完成上述所有作業,並將結果放入 sintel.flac。
ffmpeg -i 1-Snow_Fight.flac -t 31.5 -af "afade=t=out:st=28:d=2.5" sintel.flac
接著,我們會將檔案分割成 5 個 wave 檔案,每個檔案長度為 6.5 秒。由於幾乎所有編碼器都支援擷取 wave 檔案,因此使用 wave 檔案最簡單。同樣地,我們可以透過 FFmpeg 精確地執行這項操作,完成後會得到:sintel_0.wav、sintel_1.wav、sintel_2.wav、sintel_3.wav 和 sintel_4.wav。
    ffmpeg -i sintel.flac -acodec pcm_f32le -map 0 -f segment \
           -segment_list out.list -segment_time 6.5 sintel_%d.wav
接著,我們來建立 MP3 檔案。LAME 提供多種選項,可建立無間斷內容。如果您可以控管內容,不妨考慮使用 --nogap 批次編碼所有檔案,完全避免區隔間的填補。不過,為了進行這項示範,我們需要這項填補作業,因此會使用標準的高品質 VBR 編碼來編碼 Wave 檔案。
    lame -V=2 sintel_0.wav sintel_0.mp3
    lame -V=2 sintel_1.wav sintel_1.mp3
    lame -V=2 sintel_2.wav sintel_2.mp3
    lame -V=2 sintel_3.wav sintel_3.mp3
    lame -V=2 sintel_4.wav sintel_4.mp3
這樣就完成建立 MP3 檔案的必要步驟。現在我們來介紹如何建立片段式 MP4 檔案。我們會按照 Apple 的指示製作iTunes 母帶。接下來,我們會按照操作說明,將 Wave 檔案轉換為中繼 CAF 檔案,然後使用建議的參數,在 MP4 容器中將這些檔案編碼為 AAC。
    afconvert sintel_0.wav sintel_0_intermediate.caf -d 0 -f caff \
              --soundcheck-generate
    afconvert sintel_1.wav sintel_1_intermediate.caf -d 0 -f caff \
              --soundcheck-generate
    afconvert sintel_2.wav sintel_2_intermediate.caf -d 0 -f caff \
              --soundcheck-generate
    afconvert sintel_3.wav sintel_3_intermediate.caf -d 0 -f caff \
              --soundcheck-generate
    afconvert sintel_4.wav sintel_4_intermediate.caf -d 0 -f caff \
              --soundcheck-generate
    afconvert sintel_0_intermediate.caf -d aac -f m4af -u pgcm 2 --soundcheck-read \
              -b 256000 -q 127 -s 2 sintel_0.m4a
    afconvert sintel_1_intermediate.caf -d aac -f m4af -u pgcm 2 --soundcheck-read \
              -b 256000 -q 127 -s 2 sintel_1.m4a
    afconvert sintel_2_intermediate.caf -d aac -f m4af -u pgcm 2 --soundcheck-read \
              -b 256000 -q 127 -s 2 sintel_2.m4a
    afconvert sintel_3_intermediate.caf -d aac -f m4af -u pgcm 2 --soundcheck-read \
              -b 256000 -q 127 -s 2 sintel_3.m4a
    afconvert sintel_4_intermediate.caf -d aac -f m4af -u pgcm 2 --soundcheck-read \
              -b 256000 -q 127 -s 2 sintel_4.m4a
我們現在有幾個 M4A 檔案,必須先適當片段化,才能搭配 MediaSource 使用。就我們的用途而言,我們會使用一秒的片段大小。MP4Box 會將每個片段化 MP4 寫為 sintel_#_dashinit.mp4,以及可捨棄的 MPEG-DASH 資訊清單 (sintel_#_dash.mpd)。
    MP4Box -dash 1000 sintel_0.m4a && mv sintel_0_dashinit.mp4 sintel_0.mp4
    MP4Box -dash 1000 sintel_1.m4a && mv sintel_1_dashinit.mp4 sintel_1.mp4
    MP4Box -dash 1000 sintel_2.m4a && mv sintel_2_dashinit.mp4 sintel_2.mp4
    MP4Box -dash 1000 sintel_3.m4a && mv sintel_3_dashinit.mp4 sintel_3.mp4
    MP4Box -dash 1000 sintel_4.m4a && mv sintel_4_dashinit.mp4 sintel_4.mp4
    rm sintel_{0,1,2,3,4}_dash.mpd
大功告成!現在我們有片段化的 MP4 和 MP3 檔案,以及無間斷播放所需的正確中繼資料。如要進一步瞭解中繼資料的樣貌,請參閱附錄 B。
附錄 B:剖析無間隙中繼資料
與建立無間隙內容一樣,由於沒有標準的儲存方法,因此剖析無間隙中繼資料可能很棘手。以下說明 LAME 和 iTunes 這兩種最常見的編碼器,如何儲存無間隙中繼資料。首先,請設定一些輔助方法,以及上述ParseGaplessData()使用的架構。
    // Since most MP3 encoders store the gapless metadata in binary, we'll need a
    // method for turning bytes into integers.  Note: This doesn't work for values
    // larger than 2^30 since we'll overflow the signed integer type when shifting.
    function ReadInt(buffer) {
      var result = buffer.charCodeAt(0);
      for (var i = 1; i < buffer.length; ++i) {
        result <<= 8;
        result += buffer.charCodeAt(i);
      }
      return result;
    }

    function ParseGaplessData(arrayBuffer) {
      // Gapless data is generally within the first 512 bytes, so limit parsing.
      var byteStr = new TextDecoder().decode(arrayBuffer.slice(0, 512));

      var frontPadding = 0, endPadding = 0, realSamples = 0;

      // ... we'll fill this in as we go below.
我們會先介紹 Apple 的 iTunes 中繼資料格式,因為這種格式最容易剖析和說明。在 MP3 和 M4A 檔案中,iTunes (和 afconvert) 會以 ASCII 格式寫入一小段內容,如下所示:
iTunSMPB[ 26 bytes ]0000000 00000840 000001C0 0000000000046E00
這項資訊會寫入 MP3 容器的 ID3 標記,以及 MP4 容器的元資料原子。就我們的目的而言,可以忽略第一個 0000000 權杖。接下來的三個權杖分別是前端填補、尾端填補,以及非填補樣本總數。將這些值分別除以音訊的取樣率,即可得出每個值的時間長度。
// iTunes encodes the gapless data as hex strings like so:
//
//    'iTunSMPB[ 26 bytes ]0000000 00000840 000001C0 0000000000046E00'
//    'iTunSMPB[ 26 bytes ]####### frontpad  endpad    real samples'
//
// The approach here elides the complexity of actually parsing MP4 atoms. It
// may not work for all files without some tweaks.
var iTunesDataIndex = byteStr.indexOf('iTunSMPB');
if (iTunesDataIndex != -1) {
  var frontPaddingIndex = iTunesDataIndex + 34;
  frontPadding = parseInt(byteStr.substr(frontPaddingIndex, 8), 16);

  var endPaddingIndex = frontPaddingIndex + 9;
  endPadding = parseInt(byteStr.substr(endPaddingIndex, 8), 16);

  var sampleCountIndex = endPaddingIndex + 9;
  realSamples = parseInt(byteStr.substr(sampleCountIndex, 16), 16);
}
另一方面,大多數開放原始碼 MP3 編碼器會將無間隙中繼資料儲存在靜音 MPEG 影格內的特殊 Xing 標頭中 (靜音影格可讓無法解讀 Xing 標頭的解碼器播放靜音)。但遺憾的是,這個標記並非一律存在,而且有許多選用欄位。為了進行這項示範,我們控管了媒體,但在實際情況中,還需要進行一些額外的感應檢查,才能瞭解何時可使用無間隙中繼資料。
首先,我們會剖析樣本總數。為簡化起見,我們會從 Xing 標頭讀取這項資訊,但也可以從一般的 MPEG 音訊標頭建構這項資訊。星號標題可使用 Xing 或 Info 標記。這個標記後方正好有 4 個位元組,代表檔案中的總影格數;將這個值乘以每個影格的樣本數,即可得出檔案中的樣本總數。
    // Xing padding is encoded as 24bits within the header.  Note: This code will
    // only work for Layer3 Version 1 and Layer2 MP3 files with XING frame counts
    // and gapless information.  See the following document for more details:
    // http://www.codeproject.com/Articles/8295/MPEG-Audio-Frame-Header
    var xingDataIndex = byteStr.indexOf('Xing');
    if (xingDataIndex == -1) xingDataIndex = byteStr.indexOf('Info');
    if (xingDataIndex != -1) {
      // See section 2.3.1 in the link above for the specifics on parsing the Xing
      // frame count.
      var frameCountIndex = xingDataIndex + 8;
      var frameCount = ReadInt(byteStr.substr(frameCountIndex, 4));

      // For Layer3 Version 1 and Layer2 there are 1152 samples per frame.  See
      // section 2.1.5 in the link above for more details.
      var paddedSamples = frameCount * 1152;

      // ... we'll cover this below.
現在我們已取得樣本總數,可以繼續讀取填補樣本數。視編碼器而定,這項資訊可能會寫在 Xing 標頭中巢狀的 LAME 或 Lavf 標記下方。這個標頭後方正好有 17 個位元組,分別代表前端和尾端填補 (各 12 位元)。
        xingDataIndex = byteStr.indexOf('LAME');
        if (xingDataIndex == -1) xingDataIndex = byteStr.indexOf('Lavf');
        if (xingDataIndex != -1) {
          // See http://gabriel.mp3-tech.org/mp3infotag.html#delays for details of
          // how this information is encoded and parsed.
          var gaplessDataIndex = xingDataIndex + 21;
          var gaplessBits = ReadInt(byteStr.substr(gaplessDataIndex, 3));

          // Upper 12 bits are the front padding, lower are the end padding.
          frontPadding = gaplessBits >> 12;
          endPadding = gaplessBits & 0xFFF;
        }

        realSamples = paddedSamples - (frontPadding + endPadding);
      }

      return {
        audioDuration: realSamples * SECONDS_PER_SAMPLE,
        frontPaddingDuration: frontPadding * SECONDS_PER_SAMPLE
      };
    }
這樣一來,我們就擁有完整的函式,可剖析絕大多數無間隙的內容。不過,邊緣情況確實很多,因此建議您在正式環境中使用類似程式碼前,先謹慎評估。
附錄 C:關於垃圾收集
系統會根據內容類型、平台專屬限制和目前的播放位置,主動SourceBuffer進行垃圾回收。在 Chrome 中,系統會先回收已播放緩衝區的記憶體。
不過,如果記憶體用量超過平台專屬限制,系統會從未播放的緩衝區移除記憶體。
如果播放時間軸因記憶體回收而出現間隙,且間隙夠小,播放可能會發生故障;如果間隙過大,播放則會完全停止。這兩種做法都無法提供良好的使用者體驗,因此請務必避免一次附加過多資料,並手動從媒體時間軸中移除不再需要的範圍。
您可以使用每個 SourceBuffer 的 remove() 方法移除範圍,該方法會以秒為單位取得 [start, end] 範圍。與 appendBuffer() 類似,每個 remove() 完成後都會觸發一次 updateend 事件。在事件觸發前,請勿發出其他移除或附加要求。
在電腦版 Chrome 中,您一次最多可將約 12 MB 的音訊內容和 150 MB 的影片內容保留在記憶體中。您不應在瀏覽器或平台間依賴這些值;例如,這些值絕對無法代表行動裝置。
垃圾回收只會影響新增至 SourceBuffers 的資料,您可以在 JavaScript 變數中緩衝處理的資料量沒有限制。如有需要,您也可以在相同位置重新附加相同資料。