
مقدمة
تتناول هذه المقالة استخدام مكتبة JSARToolKit مع واجهة برمجة التطبيقات getUserMedia في WebRTC لتنفيذ تطبيقات الواقع المعزّز على الويب. بالنسبة إلى العرض، أستخدم WebGL بسبب الأداء المحسّن الذي يوفّره. النتيجة النهائية لهذه المقالة هي تطبيق تجريبي يعرض تصميمًا ثلاثي الأبعاد فوق علامة واقع معزّز في فيديو كاميرا الويب.
JSARToolKit هي مكتبة واقع معزّز لبرنامج JavaScript. وهي مكتبة مفتوحة المصدر تم إصدارها بموجب "الرخصة العامة GNU" وتعدّ إصدارًا مباشرًا من FLARToolKit لبرنامج Flash الذي أنشأته لعرض Mozilla Remixing Reality. FLARToolKit نفسها هي منفذ NyARToolKit لبرنامج Java، وهو منفذ ARToolKit لبرنامج C. لقد قطعنا شوطًا طويلاً، ولكننا وصلنا إلى ما نحن عليه الآن.
تعمل JSARToolKit على عناصر اللوحة. وبما أنّه يحتاج إلى قراءة الصورة من خارج اللوحة، يجب أن تكون الصورة من المصدر نفسه للصفحة أو استخدام CORS للالتفاف على سياسة المصدر نفسه. باختصار، اضبط السمة crossOrigin على '' أو 'anonymous' لعنصر الصورة أو الفيديو الذي تريد استخدامه كنسيج.
عند تمرير لوحة إلى JSARToolKit للتحليل، تعرض JSARToolKit قائمة بعلامات الواقع المعزّز المتوفّرة في الصورة ومصفّفات التحويل المقابلة. لرسم كائن ثلاثي الأبعاد فوق علامة، عليك تمرير مصفوفة التحويل إلى أي مكتبة رسومات ثلاثية الأبعاد تستخدمها حتى يتم تحويل الكائن باستخدام المصفوفة. بعد ذلك، ارسم إطار الفيديو في مشهد WebGL وارسم الجسم فوقه، ويمكنك البدء.
لتحليل الفيديو باستخدام JSARToolKit، ارسم الفيديو على لوحة، ثم مرِّر اللوحة إلى JSARToolKit. يمكنك إجراء ذلك لكل لقطة وستتمكّن من تتبُّع الواقع المعزّز في الفيديو. إنّ JSARToolKit سريعة بما يكفي على محركات JavaScript الحديثة لإجراء ذلك في الوقت الفعلي حتى على إطارات الفيديو بدقة 640x480. ومع ذلك، كلما كان إطار الفيديو أكبر، زادت مدة معالجته. يُفضَّل استخدام إطار فيديو بحجم 320×240، ولكن إذا كنت تتوقع استخدام علامات صغيرة أو علامات متعددة، يُفضَّل استخدام إطار بحجم 640×480.
عرض توضيحي
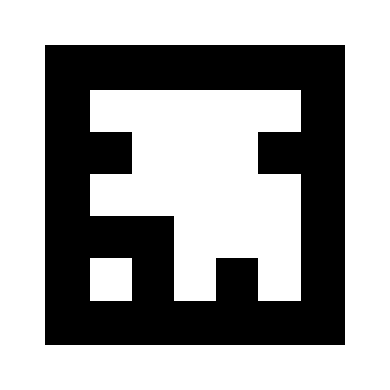
لعرض العرض التجريبي لكاميرا الويب، يجب تفعيل WebRTC في المتصفّح (في Chrome، انتقِل إلى about:flags وفعِّل MediaStream). عليك أيضًا طباعة علامة الواقع المعزّز أدناه. يمكنك أيضًا محاولة فتح صورة العلامة على هاتفك أو جهازك اللوحي وعرضها على كاميرا الويب.
إعداد JSARToolKit
تشبه واجهة برمجة التطبيقات JSARToolKit واجهة Java، لذا عليك إجراء بعض التعديلات لاستخدامها. الفكرة الأساسية هي أنّ لديك عنصر رصد يعمل على عنصر رسومات نقطية. بين أداة الكشف والشبكة المركّبة، يتوفّر عنصر مَعلمات الكاميرا الذي يحوّل إحداثيات الشبكة المركّبة إلى إحداثيات الكاميرا. للحصول على العلامات التي تم رصدها من أداة الكشف، يمكنك تكرار هذه العلامات ونسخ مصفوفات التحويل الخاصة بها إلى الرمز البرمجي.
الخطوة الأولى هي إنشاء كائن مصفوفة نقطية وكائن مَعلمات الكاميرا وكائن أداة الرصد.
// Create a RGB raster object for the 2D canvas.
// JSARToolKit uses raster objects to read image data.
// Note that you need to set canvas.changed = true on every frame.
var raster = new NyARRgbRaster_Canvas2D(canvas);

// FLARParam is the thing used by FLARToolKit to set camera parameters.
// Here we create a FLARParam for images with 320x240 pixel dimensions.
var param = new FLARParam(320, 240);

// The FLARMultiIdMarkerDetector is the actual detection engine for marker detection.
// It detects multiple ID markers. ID markers are special markers that encode a number.
var detector = new FLARMultiIdMarkerDetector(param, 120);

// For tracking video set continue mode to true. In continue mode, the detector
// tracks markers across multiple frames.
detector.setContinueMode(true);

// Copy the camera perspective matrix from the FLARParam to the WebGL library camera matrix.
// The second and third parameters determine the zNear and zFar planes for the perspective matrix.
param.copyCameraMatrix(display.camera.perspectiveMatrix, 10, 10000);
استخدام getUserMedia للوصول إلى كاميرا الويب
بعد ذلك، سأنشئ عنصر فيديو يعرض فيديو كاميرا الويب من خلال واجهات برمجة التطبيقات WebRTC. بالنسبة إلى الفيديوهات المسجّلة مسبقًا، ما عليك سوى ضبط سمة مصدر الفيديو على عنوان URL الخاص به. إذا كنت بصدد رصد العلامات من الصور الثابتة، يمكنك استخدام عنصر صورة بالطريقة نفسها تقريبًا.
بما أنّ WebRTC وgetUserMedia لا يزالان تكنولوجيات جديدة قيد الظهور، عليك تضمين ميزة لرصدهما. لمزيد من التفاصيل، يمكنك الاطّلاع على مقالة "إريك بيدلمان " حول تسجيل الصوت والفيديو في HTML5.
var video = document.createElement('video');
video.width = 320;
video.height = 240;

var getUserMedia = function(t, onsuccess, onerror) {
  if (navigator.getUserMedia) {
    return navigator.getUserMedia(t, onsuccess, onerror);
  } else if (navigator.webkitGetUserMedia) {
    return navigator.webkitGetUserMedia(t, onsuccess, onerror);
  } else if (navigator.mozGetUserMedia) {
    return navigator.mozGetUserMedia(t, onsuccess, onerror);
  } else if (navigator.msGetUserMedia) {
    return navigator.msGetUserMedia(t, onsuccess, onerror);
  } else {
    onerror(new Error("No getUserMedia implementation found."));
  }
};

var URL = window.URL || window.webkitURL;
var createObjectURL = URL.createObjectURL || webkitURL.createObjectURL;
if (!createObjectURL) {
  throw new Error("URL.createObjectURL not found.");
}

getUserMedia({'video': true},
  function(stream) {
    var url = createObjectURL(stream);
    video.src = url;
  },
  function(error) {
    alert("Couldn't access webcam.");
  }
);
رصد العلامات
بعد أن يصبح أداة الكشف تعمل على ما يرام، يمكننا البدء في تزويدها بالصور لرصد مصفوفات الواقع المعزّز. أولاً، ارسم الصورة على لوحة العنصر الممسوح ضوئيًا، ثم أجرِ أداة الكشف على العنصر الممسوح ضوئيًا. يعرض أداة الكشف عدد العلامات التي تم العثور عليها في الصورة.
// Draw the video frame to the raster canvas, scaled to 320x240.
canvas.getContext('2d').drawImage(video, 0, 0, 320, 240);

// Tell the raster object that the underlying canvas has changed.
canvas.changed = true;

// Do marker detection by using the detector object on the raster object.
// The threshold parameter determines the threshold value
// for turning the video frame into a 1-bit black-and-white image.
//
var markerCount = detector.detectMarkerLite(raster, threshold);
الخطوة الأخيرة هي تكرار المرور على العلامات التي تم رصدها والحصول على مصفوفات التحويل الخاصة بها. يمكنك استخدام مصفوفات التحويل لوضع عناصر ثلاثية الأبعاد فوق العلامات.
// Create a NyARTransMatResult object for getting the marker translation matrices.
var resultMat = new NyARTransMatResult();
var markers = {};
// Go through the detected markers and get their IDs and transformation matrices.
for (var idx = 0; idx < markerCount; idx++) {
// Get the ID marker data for the current marker.
// ID markers are special kind of markers that encode a number.
// The bytes for the number are in the ID marker data.
var id = detector.getIdMarkerData(idx);
// Read bytes from the id packet.
var currId = -1;
// This code handles only 32-bit numbers or shorter.
if (id.packetLength <= 4) {
currId = 0;
for (var i = 0; i < id.packetLength; i++) {
currId = (currId << 8) | id.getPacketData(i);
}
}
// If this is a new id, let's start tracking it.
if (markers[currId] == null) {
markers[currId] = {};
}
// Get the transformation matrix for the detected marker.
detector.getTransformMatrix(idx, resultMat);
// Copy the result matrix into our marker tracker object.
markers[currId].transform = Object.asCopy(resultMat);
}
ربط المصفوفات
في ما يلي الرمز البرمجي لنسخ مصفوفات JSARToolKit إلى مصفوفات glMatrix (التي تتألف من FloatArrays التي تتضمّن 16 عنصرًا مع عمود الترجمة في العناصر الأربعة الأخيرة). تعمل هذه الطريقة بطريقة سحرية (أي أنّني لا أعرف كيفية إعداد مصفوفات ARToolKit). أعتقد أنّ المحور الصادي مقلوب.) على أي حال، تؤدي هذه الحيل السحرية لعكس العلامة إلى جعل مصفوفة JSARToolKit تعمل بالطريقة نفسها التي تعمل بها glMatrix.
لاستخدام المكتبة مع مكتبة أخرى، مثل Three.js، عليك كتابة دالة تحوّل مصفوفات ARToolKit إلى تنسيق مصفوفة المكتبة. عليك أيضًا الربط بطريقة FLARParam.copyCameraMatrix. تُسجِّل طريقة copyCameraMatrix مصفوفة منظور FLARParam في مصفوفة بأسلوب glMatrix.
function copyMarkerMatrix(arMat, glMat) {
  glMat[0] = arMat.m00;
  glMat[1] = -arMat.m10;
  glMat[2] = arMat.m20;
  glMat[3] = 0;
  glMat[4] = arMat.m01;
  glMat[5] = -arMat.m11;
  glMat[6] = arMat.m21;
  glMat[7] = 0;
  glMat[8] = -arMat.m02;
  glMat[9] = arMat.m12;
  glMat[10] = -arMat.m22;
  glMat[11] = 0;
  glMat[12] = arMat.m03;
  glMat[13] = -arMat.m13;
  glMat[14] = arMat.m23;
  glMat[15] = 1;
}
دمج Three.js
Three.js هو محرك JavaScript ثلاثي الأبعاد شائع. سأشرح كيفية استخدام مخرجات JSARToolKit في Three.js. تحتاج إلى ثلاثة عناصر: مربّع بملء الشاشة تم رسم صورة الفيديو عليه، وكاميرا تحتوي على مصفوفة منظور FLARParam، وعنصر يحتوي على مصفوفة العلامة كتحويل. سأرشدك خلال عملية الدمج في الرمز البرمجي أدناه.
// I'm going to use a glMatrix-style matrix as an intermediary.
// So the first step is to create a function to convert a glMatrix matrix into a Three.js Matrix4.
THREE.Matrix4.prototype.setFromArray = function(m) {
  return this.set(
    m[0], m[4], m[8], m[12],
    m[1], m[5], m[9], m[13],
    m[2], m[6], m[10], m[14],
    m[3], m[7], m[11], m[15]
  );
};

// glMatrix matrices are flat arrays.
var tmp = new Float32Array(16);

// Create a camera and a marker root object for your Three.js scene.
var camera = new THREE.Camera();
scene.add(camera);

var markerRoot = new THREE.Object3D();
markerRoot.matrixAutoUpdate = false;

// Add the marker models and suchlike into your marker root object.
var cube = new THREE.Mesh(
  new THREE.CubeGeometry(100,100,100),
  new THREE.MeshBasicMaterial({color: 0xff00ff})
);
cube.position.z = -50;
markerRoot.add(cube);

// Add the marker root to your scene.
scene.add(markerRoot);

// Next we need to make the Three.js camera use the FLARParam matrix.
param.copyCameraMatrix(tmp, 10, 10000);
camera.projectionMatrix.setFromArray(tmp);


// To display the video, first create a texture from it.
var videoTex = new THREE.Texture(videoCanvas);

// Then create a plane textured with the video.
var plane = new THREE.Mesh(
  new THREE.PlaneGeometry(2, 2, 0),
  new THREE.MeshBasicMaterial({map: videoTex})
);

// The video plane shouldn't care about the z-buffer.
plane.material.depthTest = false;
plane.material.depthWrite = false;

// Create a camera and a scene for the video plane and
// add the camera and the video plane to the scene.
var videoCam = new THREE.Camera();
var videoScene = new THREE.Scene();
videoScene.add(plane);
videoScene.add(videoCam);

...

// On every frame do the following:
function tick() {
  // Draw the video frame to the canvas.
  videoCanvas.getContext('2d').drawImage(video, 0, 0);
  canvas.getContext('2d').drawImage(videoCanvas, 0, 0, canvas.width, canvas.height);

  // Tell JSARToolKit that the canvas has changed.
  canvas.changed = true;

  // Update the video texture.
  videoTex.needsUpdate = true;

  // Detect the markers in the video frame.
  var markerCount = detector.detectMarkerLite(raster, threshold);
  for (var i=0; i<markerCount; i++) {
    // Get the marker matrix into the result matrix.
    detector.getTransformMatrix(i, resultMat);

    // Copy the marker matrix to the tmp matrix.
    copyMarkerMatrix(resultMat, tmp);

    // Copy the marker matrix over to your marker root object.
    markerRoot.matrix.setFromArray(tmp);
  }

  // Render the scene.
  renderer.autoClear = false;
  renderer.clear();
  renderer.render(videoScene, videoCam);
  renderer.render(scene, camera);
}
ملخّص
في هذه المقالة، اطّلعنا على أساسيات JSARToolKit. أنت الآن جاهز لإنشاء تطبيقات الواقع المعزّز باستخدام كاميرا الويب باستخدام JavaScript.
إنّ دمج JSARToolKit مع Three.js ليس بالأمر السهل، ولكنّه ممكن بالتأكيد. لست متأكّدًا بنسبة% 100 من أنّني أُجري ذلك بشكل صحيح في العرض التجريبي، لذا يُرجى إعلامي إذا كنت تعرف طريقة أفضل لإجراء عملية الدمج. نرحب بالاقتراحات :)