使用 WebAssembly 時,您通常會下載模組、編譯模組、將模組例項化,然後在 JavaScript 中使用模組匯出的任何內容。本篇文章將說明我們建議的最佳效率做法。
使用 WebAssembly 時,您通常會下載模組、編譯模組、將其例項化,然後在 JavaScript 中使用所匯出的任何內容。本文一開始會介紹一個常見但不太理想的程式碼片段,並討論幾種可能的最佳化方式,最後會說明從 JavaScript 執行 WebAssembly 最簡單、最有效率的方式。
這個程式碼片段會執行完整的下載-編譯-例項化舞步,但方式並非最佳:
請勿使用!
(async () => {
  const response = await fetch('fibonacci.wasm');
  const buffer = await response.arrayBuffer();
  const module = new WebAssembly.Module(buffer);
  const instance = new WebAssembly.Instance(module);
  const result = instance.exports.fibonacci(42);
  console.log(result);
})();
請注意,我們如何使用 new WebAssembly.Module(buffer) 將回應緩衝區轉換為模組。這是同步 API,也就是說,它會阻斷主執行緒,直到完成為止。為避免使用者使用 WebAssembly.Module,Chrome 會針對大於 4 KB 的緩衝區停用 WebAssembly.Module。如要解決大小限制問題,我們可以改用 await WebAssembly.compile(buffer):
(async () => {
  const response = await fetch('fibonacci.wasm');
  const buffer = await response.arrayBuffer();
  const module = await WebAssembly.compile(buffer);
  const instance = new WebAssembly.Instance(module);
  const result = instance.exports.fibonacci(42);
  console.log(result);
})();
await WebAssembly.compile(buffer) 仍然不是最佳做法,但我們稍後會說明。
由於 await 的使用方式很清楚,因此現在修改後的程式碼片段中幾乎所有作業都是非同步的。唯一的例外狀況是 new WebAssembly.Instance(module),在 Chrome 中,此類檔案有相同的 4 KB 緩衝區大小限制。為了保持一致性,並讓主執行緒保持空閒,我們可以使用非同步的 WebAssembly.instantiate(module)。
(async () => {
  const response = await fetch('fibonacci.wasm');
  const buffer = await response.arrayBuffer();
  const module = await WebAssembly.compile(buffer);
  const instance = await WebAssembly.instantiate(module);
  const result = instance.exports.fibonacci(42);
  console.log(result);
})();
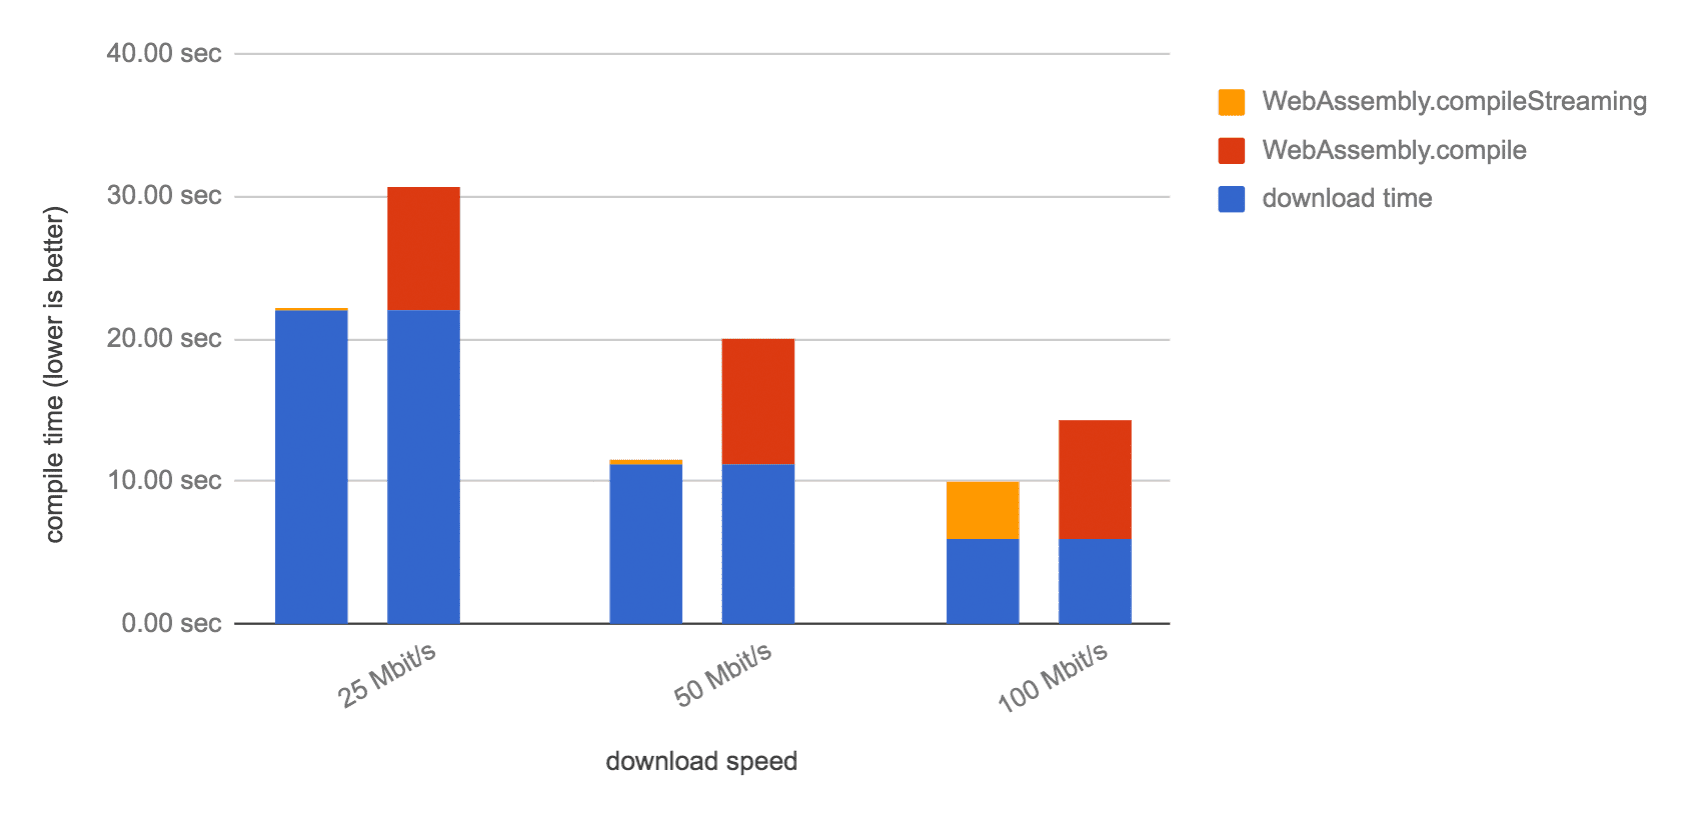
讓我們回到先前提到的 compile 最佳化。透過串流編譯功能,瀏覽器可以在模組位元組下載期間開始編譯 WebAssembly 模組。由於下載和編譯作業會並行進行,因此速度會更快,尤其是針對大型酬載。

如要啟用這項最佳化功能,請改用 WebAssembly.compileStreaming 而非 WebAssembly.compile。這項變更也讓我們可以移除中繼陣列緩衝區,因為我們現在可以直接傳遞 await fetch(url) 傳回的 Response 例項。
(async () => {
  const response = await fetch('fibonacci.wasm');
  const module = await WebAssembly.compileStreaming(response);
  const instance = await WebAssembly.instantiate(module);
  const result = instance.exports.fibonacci(42);
  console.log(result);
})();
WebAssembly.compileStreaming API 也接受解析為 Response 例項的 Promise。如果您不需要在程式碼的其他位置使用 response,可以直接傳遞 fetch 傳回的承諾,而無需明確 await 其結果:
(async () => {
  const fetchPromise = fetch('fibonacci.wasm');
  const module = await WebAssembly.compileStreaming(fetchPromise);
  const instance = await WebAssembly.instantiate(module);
  const result = instance.exports.fibonacci(42);
  console.log(result);
})();
如果您也不需要在其他地方使用 fetch 結果,甚至可以直接傳遞:
(async () => {
  const module = await WebAssembly.compileStreaming(
    fetch('fibonacci.wasm'));
  const instance = await WebAssembly.instantiate(module);
  const result = instance.exports.fibonacci(42);
  console.log(result);
})();
不過,我個人認為將其放在不同行會更容易閱讀。
想瞭解如何將回應編譯為模組,然後立即將其例項化嗎?事實上,WebAssembly.instantiate 可以一次編譯及例項化。WebAssembly.instantiateStreaming API 會以串流方式執行這項作業:
(async () => {
  const fetchPromise = fetch('fibonacci.wasm');
  const { module, instance } = await WebAssembly.instantiateStreaming(fetchPromise);
  // To create a new instance later:
  const otherInstance = await WebAssembly.instantiate(module);
  const result = instance.exports.fibonacci(42);
  console.log(result);
})();
如果您只需要單一例項,就沒有保留 module 物件的必要,因此可以進一步簡化程式碼:
// This is our recommended way of loading WebAssembly.
(async () => {
  const fetchPromise = fetch('fibonacci.wasm');
  const { instance } = await WebAssembly.instantiateStreaming(fetchPromise);
  const result = instance.exports.fibonacci(42);
  console.log(result);
})();
我們套用的最佳化方式如下:
- 使用非同步 API 避免阻斷主執行緒
- 使用串流 API 更快速地編譯及例項化 WebAssembly 模組
- 不要編寫不需要的程式碼
歡迎盡情使用 WebAssembly!


