

到目前為止,我們已探討變更通知外觀顯示方式的選項。您也可以使用其他選項變更通知的行為。
根據預設,只使用視覺選項呼叫 showNotification() 時,會產生以下行為:
- 點選通知後沒有任何反應。
- 每則新通知會依序顯示。瀏覽器不會以任何方式收合通知。
- 平台可能會播放聲音或讓使用者裝置震動 (視平台而定)。
- 在某些平台上,通知會在短時間後消失,但在其他平台上,除非使用者與通知互動,否則通知會持續顯示。(例如,比較 Android 和電腦上的通知)。
在本節中,我們將探討如何僅使用選項變更這些預設行為。這些方法相對容易實作,且可發揮效益。
通知點擊事件
使用者點選通知時,預設行為是什麼事也不做。甚至不會關閉或移除通知。
按一下通知的常見做法是關閉通知並執行其他邏輯 (例如開啟視窗或對應用程式發出一些 API 呼叫)。
為此,您需要在服務工作者中新增 'notificationclick' 事件監聽器。只要使用者點選通知,系統就會呼叫這個方法。
self.addEventListener('notificationclick', (event) => {
  const clickedNotification = event.notification;
  clickedNotification.close();

  // Do something as the result of the notification click
  const promiseChain = doSomething();
  event.waitUntil(promiseChain);
});
如您在本範例中所見,點選的通知可透過 event.notification 存取。您可以透過此方法存取通知的屬性和方法。在這種情況下,您可以呼叫其 close() 方法並執行其他工作。
動作
除了點選通知之外,您還可以透過動作與使用者建立另一層互動。
按鈕
在上一節中,您已瞭解如何在呼叫 showNotification() 時定義動作按鈕:
const title = 'Actions Notification';

const options = {
  actions: [
    {
      action: 'coffee-action',
      title: 'Coffee',
      type: 'button',
      icon: '/images/demos/action-1-128x128.png',
    },
    {
      action: 'doughnut-action',
      type: 'button',
      title: 'Doughnut',
      icon: '/images/demos/action-2-128x128.png',
    },
    {
      action: 'gramophone-action',
      type: 'button',
      title: 'Gramophone',
      icon: '/images/demos/action-3-128x128.png',
    },
    {
      action: 'atom-action',
      type: 'button',
      title: 'Atom',
      icon: '/images/demos/action-4-128x128.png',
    },
  ],
};

registration.showNotification(title, options);
如果使用者按下動作按鈕,請檢查 noticationclick 事件中的 event.action 值,瞭解使用者按下哪個動作按鈕。
event.action 會包含選項中設定的 action 值。在上例中,event.action 值會是下列其中一個:'coffee-action'、'doughnut-action'、'gramophone-action' 或 'atom-action'。
我們會利用這項功能偵測通知點擊或動作點擊,如下所示:
self.addEventListener('notificationclick', (event) => {
  if (!event.action) {
    // Was a normal notification click
    console.log('Notification Click.');
    return;
  }

  switch (event.action) {
    case 'coffee-action':
      console.log("User ❤️️'s coffee.");
      break;
    case 'doughnut-action':
      console.log("User ❤️️'s doughnuts.");
      break;
    case 'gramophone-action':
      console.log("User ❤️️'s music.");
      break;
    case 'atom-action':
      console.log("User ❤️️'s science.");
      break;
    default:
      console.log(`Unknown action clicked: '${event.action}'`);
      break;
  }
});
內嵌回覆
此外,在上一節中,您已瞭解如何在通知中新增內嵌回覆:
const title = 'Poll';

const options = {
  body: 'Do you like this photo?',
  image: '/images/demos/cat-image.jpg',
  icon: '/images/demos/icon-512x512.png',
  badge: '/images/demos/badge-128x128.png',
  actions: [
    {
      action: 'yes',
      type: 'button',
      title: '👍 Yes',
    },
    {
      action: 'no',
      type: 'text',
      title: '👎 No (explain why)',
      placeholder: 'Type your explanation here',
    },
  ],
};

registration.showNotification(title, options);
event.reply 會包含使用者在輸入欄位中輸入的值:
self.addEventListener('notificationclick', (event) => {
  const reply = event.reply;

  // Do something with the user's reply
  const promiseChain = doSomething(reply);
  event.waitUntil(promiseChain);
});
標記
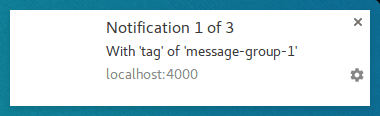
tag 選項基本上是用於「群組」通知的字串 ID,可讓您輕鬆決定如何向使用者顯示多則通知。最簡單的說明方式就是舉例說明。
我們來顯示通知,並為其加上標記 'message-group-1'。我們會使用以下程式碼顯示通知:
const title = 'Notification 1 of 3';

const options = {
  body: "With 'tag' of 'message-group-1'",
  tag: 'message-group-1',
};

registration.showNotification(title, options);
這會顯示第一則通知。
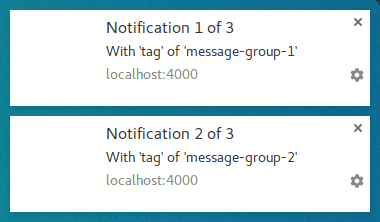
我們來使用新的 'message-group-2' 標記顯示第二則通知,如下所示:
const title = 'Notification 2 of 3';

const options = {
  body: "With 'tag' of 'message-group-2'",
  tag: 'message-group-2',
};

registration.showNotification(title, options);
系統會向使用者顯示第二則通知。
接下來,我們將顯示第三則通知,但重複使用第一個 'message-group-1' 標記。這樣做會關閉第一則通知,並以新的通知取代。
const title = 'Notification 3 of 3';

const options = {
  body: "With 'tag' of 'message-group-1'",
  tag: 'message-group-1',
};

registration.showNotification(title, options);
即使 showNotification() 已呼叫三次,我們現在仍有兩則通知。
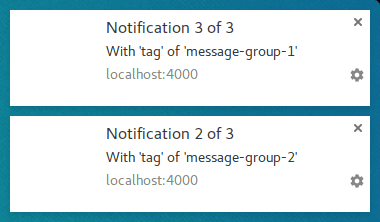
tag 選項只是一種分組訊息的方式,如果目前顯示的任何舊通知與新通知具有相同的標記,就會關閉。
使用 tag 時,有一個細微差異:當 tag 取代通知時,不會發出聲響或震動。
這時 renotify 選項就派上用場。
重新通知
這項規定主要適用於本文撰寫時的行動裝置。設定這個選項後,系統會在收到新通知時震動並播放系統音效。
在某些情況下,您可能會想使用取代通知來通知使用者,而非靜默更新。即時通訊應用程式就是個好例子。在這種情況下,您應將 tag 和 renotify 設為 true。
const title = 'Notification 2 of 2';

const options = {
  tag: 'renotify',
  renotify: true,
};

registration.showNotification(title, options);
靜音
這個選項可讓您顯示新通知,但會避免裝置產生震動、發出聲響和開啟螢幕的預設行為。
如果通知不需要使用者立即處理,這就是理想的做法。
const title = 'Silent Notification';

const options = {
  silent: true,
};

registration.showNotification(title, options);
需要互動
桌面版 Chrome 會在一段時間內顯示通知,然後隱藏通知。Android 版 Chrome 不會出現這種情形。通知會持續顯示,直到使用者與其互動為止。
如要強制通知持續顯示,直到使用者與其互動為止,請新增 requireInteraction 選項。這麼做會顯示通知,直到使用者關閉或點選通知為止。
const title = 'Require Interaction Notification';

const options = {
  requireInteraction: true,
};

registration.showNotification(title, options);
請謹慎使用這個選項。顯示通知並強制使用者停止手邊工作來關閉通知,可能會讓使用者感到不便。
在下一節中,我們將探討網站上用於管理通知和執行動作 (例如在使用者點選通知時開啟網頁) 的常見模式。
後續步驟
- 網路推播通知總覽
- 推播的運作方式
- 訂閱使用者
- 權限使用者體驗
- 使用 Web Push 程式庫傳送訊息
- Web Push 通訊協定
- 處理推播事件
- 顯示通知
- 通知行為
- 常見的通知模式
- 推播通知常見問題
- 常見問題和回報錯誤