

지금까지 알림의 시각적 모양을 변경하는 옵션을 살펴봤습니다. 알림 동작을 변경하는 옵션도 있습니다.
기본적으로 시각적 옵션만 사용하여 showNotification()를 호출하면 다음과 같은 동작이 발생합니다.
- 알림을 클릭해도 아무 일도 일어나지 않습니다.
- 새 알림이 각각 차례로 표시됩니다. 브라우저가 알림을 접을 수 없습니다.
- 플랫폼에 따라 플랫폼에서 소리를 재생하거나 사용자의 기기를 진동시킬 수 있습니다.
- 일부 플랫폼에서는 알림이 잠시 후 사라지는 반면, 사용자가 알림과 상호작용하지 않는 한 알림이 계속 표시되는 플랫폼도 있습니다. 예를 들어 Android와 데스크톱의 알림을 비교해 보세요.
이 섹션에서는 옵션만 사용하여 이러한 기본 동작을 변경하는 방법을 살펴봅니다. 이러한 방법은 비교적 쉽게 구현하고 활용할 수 있습니다.
알림 클릭 이벤트
사용자가 알림을 클릭하면 기본 동작은 아무 일도 일어나지 않는 것입니다. 알림을 닫거나 삭제하지도 않습니다.
알림을 클릭하면 일반적으로 알림이 닫히고 다른 로직 (예: 창 열기 또는 애플리케이션에 대한 API 호출)이 실행됩니다.
이를 위해서는 서비스 워커에 'notificationclick' 이벤트 리스너를 추가해야 합니다. 이 함수는 알림이 클릭될 때마다 호출됩니다.
self.addEventListener('notificationclick', (>event) = {
  const clickedNotification = event.notification;
  clickedNotification.close();

  // Do something as the result of the notification click
  const promiseChain = doSomething();
  event.waitUntil(promiseChain);
});
이 예에서 알 수 있듯이 클릭된 알림은 event.notification로 액세스할 수 있습니다. 이를 통해 알림의 속성과 메서드에 액세스할 수 있습니다. 이 경우 close() 메서드를 호출하고 추가 작업을 실행합니다.
작업
작업을 사용하면 알림을 클릭하는 것만으로 사용자와 한 단계 높은 수준의 상호작용을 만들 수 있습니다.
버튼
이전 섹션에서는 showNotification()를 호출할 때 작업 버튼을 정의하는 방법을 살펴봤습니다.
const title = 'Actions Notification';

const options = {
  actions: [
    {
      action: 'coffee-action',
      title: 'Coffee',
      type: 'button',
      icon: '/images/demos/action-1-128x128.png',
    },
    {
      action: 'doughnut-action',
      type: 'button',
      title: 'Doughnut',
      icon: '/images/demos/action-2-128x128.png',
    },
    {
      action: 'gramophone-action',
      type: 'button',
      title: 'Gramophone',
      icon: '/images/demos/action-3-128x128.png',
    },
    {
      action: 'atom-action',
      type: 'button',
      title: 'Atom',
      icon: '/images/demos/action-4-128x128.png',
    },
  ],
};

registration.showNotification(title, options);
사용자가 작업 버튼을 클릭하면 noticationclick 이벤트에서 event.action 값을 확인하여 어떤 작업 버튼이 클릭되었는지 확인합니다.
event.action에는 옵션에 설정된 action 값이 포함됩니다. 위 예에서 event.action 값은 'coffee-action', 'doughnut-action', 'gramophone-action', 'atom-action' 중 하나입니다.
이를 통해 다음과 같이 알림 클릭 또는 작업 클릭을 감지할 수 있습니다.
self.addEventListener('notificationclick', (>event) = {
  if (!event.action) {
    // Was a normal notification click
    console.log('Notification Click.');
    return;
  }

  switch (event.action) {
    case 'coffee-action':
      console.log("User ❤️️'s coffee.");
      break;
    case 'doughnut-action':
      console.log("User ❤️️'s doughnuts.");
      break;
    case 'gramophone-action':
      console.log("User ❤️️'s music.");
      break;
    case 'atom-action':
      console.log("User ❤️️'s science.");
      break;
    default:
      console.log(`Unknown action clicked: '${event.action}'`);
      break;
  }
});
인라인 답글
또한 이전 섹션에서는 알림에 인라인 답장을 추가하는 방법을 알아봤습니다.
const title = 'Poll';

const options = {
  body: 'Do you like this photo?',
  image: '/images/demos/cat-image.jpg',
  icon: '/images/demos/icon-512x512.png',
  badge: '/images/demos/badge-128x128.png',
  actions: [
    {
      action: 'yes',
      type: 'button',
      title: '👍 Yes',
    },
    {
      action: 'no',
      type: 'text',
      title: '👎 No (explain why)',
      placeholder: 'Type your explanation here',
    },
  ],
};

registration.showNotification(title, options);
event.reply에는 사용자가 입력란에 입력한 값이 포함됩니다.
self.addEventListener('notificationclick', (>event) = {
  const reply = event.reply;

  // Do something with the user's reply
  const promiseChain = doSomething(reply);
  event.waitUntil(promiseChain);
});
태그
tag 옵션은 본질적으로 알림을 '그룹화'하는 문자열 ID로, 여러 알림이 사용자에게 표시되는 방식을 쉽게 결정할 수 있는 방법을 제공합니다. 예를 들어 설명하는 것이 가장 쉽습니다.
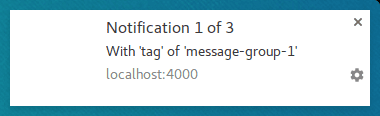
알림을 표시하고 태그를 'message-group-1'로 지정해 보겠습니다. 다음 코드로 알림을 표시합니다.
const title = 'Notification 1 of 3';

const options = {
  body: "With 'tag' of 'message-group-1'",
  tag: 'message-group-1',
};

registration.showNotification(title, options);
그러면 첫 번째 알림이 표시됩니다.
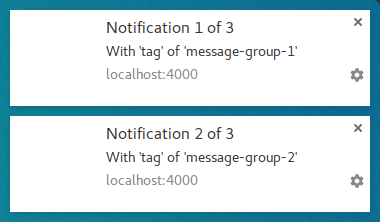
다음과 같이 새 태그 'message-group-2'를 사용하여 두 번째 알림을 표시해 보겠습니다.
const title = 'Notification 2 of 3';

const options = {
  body: "With 'tag' of 'message-group-2'",
  tag: 'message-group-2',
};

registration.showNotification(title, options);
그러면 사용자에게 두 번째 알림이 표시됩니다.
이제 세 번째 알림을 표시하지만 첫 번째 태그 'message-group-1'를 재사용해 보겠습니다. 이렇게 하면 첫 번째 알림이 닫히고 새 알림으로 대체됩니다.
const title = 'Notification 3 of 3';

const options = {
  body: "With 'tag' of 'message-group-1'",
  tag: 'message-group-1',
};

registration.showNotification(title, options);
이제 showNotification()가 세 번 호출되었지만 알림이 두 개 있습니다.
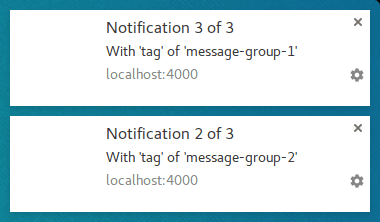
tag 옵션은 메시지를 그룹화하는 한 가지 방법으로, 새 알림과 태그가 동일한 경우 현재 표시되고 있는 이전 알림이 닫히도록 합니다.
tag를 사용할 때의 미묘한 점은 알림을 대체할 때 소리나 진동이 없다는 점입니다.
이때 renotify 옵션이 사용됩니다.
다시 알림
이는 작성 시점에 휴대기기에 주로 적용됩니다. 이 옵션을 설정하면 새 알림이 진동하고 시스템 소리가 재생됩니다.
자동 업데이트 대신 대체 알림을 통해 사용자에게 알리기를 원하는 시나리오가 있습니다. 채팅 애플리케이션이 좋은 예입니다. 이 경우 tag 및 renotify를 true로 설정해야 합니다.
const title = 'Notification 2 of 2';

const options = {
  tag: 'renotify',
  renotify: true,
};

registration.showNotification(title, options);
무음
이 옵션을 사용하면 새 알림을 표시할 수 있지만 진동, 소리, 기기 디스플레이 켜기의 기본 동작은 방지됩니다.
알림에 사용자의 즉각적인 주의가 필요하지 않은 경우에 적합합니다.
const title = 'Silent Notification';

const options = {
  silent: true,
};

registration.showNotification(title, options);
상호작용이 필요합니다.
데스크톱의 Chrome에서는 일정 시간 동안 알림을 표시한 후 숨깁니다. Android의 Chrome에는 이 동작이 없습니다. 알림은 사용자가 알림과 상호작용할 때까지 표시됩니다.
사용자가 알림과 상호작용할 때까지 알림이 계속 표시되도록 하려면 requireInteraction 옵션을 추가합니다. 이렇게 하면 사용자가 알림을 닫거나 클릭할 때까지 알림이 표시됩니다.
const title = 'Require Interaction Notification';

const options = {
  requireInteraction: true,
};

registration.showNotification(title, options);
이 옵션은 신중하게 사용하세요. 알림을 표시하고 사용자가 알림을 닫기 위해 하고 있는 작업을 중단하도록 강요하면 불편을 끼칠 수 있습니다.
다음 섹션에서는 웹에서 알림을 관리하고 알림을 클릭할 때 페이지를 여는 등의 작업을 실행하는 데 사용되는 일반적인 패턴을 살펴봅니다.
다음에 수행할 작업
- 웹 푸시 알림 개요
- 푸시의 작동 방식
- 사용자 구독하기
- 권한 UX
- 웹 푸시 라이브러리로 메시지 전송
- 웹 푸시 프로토콜
- 푸시 이벤트 처리
- 알림 표시
- 알림 동작
- 일반 알림 패턴
- 푸시 알림 FAQ
- 일반적인 문제 및 버그 신고하기