##### [The CSS Podcast - 013: Spacing](https://thecsspodcast.libsyn.com/011-spacing)

Say you've got a collection of three boxes,
stacked on top of each other and you want space between them.
How many ways can you think of to do that in CSS?

![Three stacked boxes with a downward arrow](https://web.dev/static/learn/css/spacing/image/three-stacked-boxes-a-do-9c3f96bcb965c.svg)

The `margin` property *might* give you what you need,
but it also might add additional spacing that you don't want.
For example, how do you target just the space *in between* each of those elements?
Something like `gap` might be more appropriate in this case.
There are many ways to adjust spacing within a UI,
each with its own strengths and caveats.

## HTML spacing

HTML itself provides some methods to space elements.
The `<br>` and `<hr>` elements allow you to space elements in the block direction,
which if you are in a latin-based language,
is top-to-bottom.

If you use a `<br>` element,
it will create a line-break,
just like if you were to press your enter key in a word processor.

The `<hr>` creates a horizontal line with space either-side, known as `margin`.
<iframe allow="camera; clipboard-read; clipboard-write; encrypted-media; geolocation; microphone; midi;" loading="lazy" src="https://codepen.io/web-dot-dev/embed/dyNRJQg?height=500&amp;theme-id=light&amp;default-tab=result&amp;editable=true" style="height: 100%; width: 100%; border: 0;" title="Pen dyNRJQg by web-dot-dev on Codepen"></iframe>

Along with using HTML elements,
HTML *entities* can create space.
An HTML entity is a reserved string of characters that are replaced with character entities by the browser.
For example,
if you were to type `&copy;` in your HTML file,
it would be converted into a © character.
The `&nbsp;` entity is converted into a non-breaking space character,
which provides an inline space.
Be careful though,
because the non-breaking aspect of this character stitches the two elements together,
which can result in odd behaviour.

> [!NOTE]
> **Note:** Use HTML elements to add space only when the element helps with the understanding of the document. For example, an `<hr>` doesn't just add space, it creates a logical separation of two chunks of content. If you just want a line with space around it, adding a border with CSS might be more appropriate.

## Margin

If you want to add space to the outside of an element,
you use the `margin` property.
Margin is like adding a cushion around your element.
The `margin` property is shorthand for `margin-top`,
`margin-right`, `margin-bottom` and `margin-left`.

![A diagram of the four main areas of the box model.](https://web.dev/static/learn/css/spacing/image/a-diagram-the-four-main-0547c6c8ed138.svg)

The `margin` shorthand applies properties in a particular order:
top, right, bottom and left.
You can remember these with trouble: TRouBLe.

![The word 'Trouble' running downwards with T, R, B and L
extending to Top, Right, Bottom and Left.
A box with arrows showing the directions too.](https://web.dev/static/learn/css/spacing/image/the-word-trouble-runnin-645c6ed02703c.svg)

The `margin` shorthand can also be used with one, two, or three values.
Adding a fourth value lets you set each individual side.
These are applied as follows:

- One value will be applied to all sides. (`margin: 20px`).
- Two values: the first value will be applied to the top and bottom sides, and the second value will be applied to the left and right sides. (`margin: 20px 40px`)
- Three values: the first value is `top`, the second value is `left` **and** `right`, and the third value is `bottom`. (`margin: 20px 40px 30px`).

<iframe allow="camera; clipboard-read; clipboard-write; encrypted-media; geolocation; microphone; midi;" loading="lazy" src="https://codepen.io/web-dot-dev/embed/abpwqyQ?height=500&amp;theme-id=light&amp;default-tab=result&amp;editable=true" style="height: 100%; width: 100%; border: 0;" title="Pen abpwqyQ by web-dot-dev on Codepen"></iframe>

Margin can be defined with a length,
percentage or auto value, such as `1em` or `20%`.
If you use a percentage,
the value will be calculated based on the width of your element's containing block.

This means that if your element's containing block has a width of `250px`
and your element has a `margin` value of `20%`:
each side of your element will have a computed margin of `50px`.
<iframe allow="camera; clipboard-read; clipboard-write; encrypted-media; geolocation; microphone; midi;" loading="lazy" src="https://codepen.io/web-dot-dev/embed/YzNQeyb?height=500&amp;theme-id=light&amp;default-tab=result&amp;editable=true" style="height: 100%; width: 100%; border: 0;" title="Pen YzNQeyb by web-dot-dev on Codepen"></iframe>

You can also use a value of `auto` for margin.
For block level elements with a restricted size,
an `auto` margin will take up available space in the direction that it is applied to.
A good example is this one,
from the [flexbox module](https://web.dev/learn/css/flexbox), where the items push away from each other.
<iframe allow="camera; clipboard-read; clipboard-write; encrypted-media; geolocation; microphone; midi;" loading="lazy" src="https://codepen.io/web-dot-dev/embed/poRELbR?height=500&amp;theme-id=light&amp;default-tab=result&amp;editable=true" style="height: 100%; width: 100%; border: 0;" title="Pen poRELbR by web-dot-dev on Codepen"></iframe>

Another good example of `auto` margin is a horizontally centered wrapper which has a max width.
This sort of wrapper is often used to create a consistent center column on a website.

    .wrapper {
        max-width: 400px;
        margin: 0 auto;
    }

<iframe allow="camera; clipboard-read; clipboard-write; encrypted-media; geolocation; microphone; midi;" loading="lazy" src="https://codepen.io/web-dot-dev/embed/XWpgZKq?height=500&amp;theme-id=light&amp;default-tab=result&amp;editable=true" style="height: 100%; width: 100%; border: 0;" title="Pen XWpgZKq by web-dot-dev on Codepen"></iframe>

Here, margin is removed from the top and bottom (block) sides,
and `auto` shares the space between the left and right (inline) sides.

> [!NOTE]
> **Note:** In the previous module on [logical properties](https://web.dev/learn/css/logical-properties), you learned that instead of specifying `margin-top`, `margin-right`, `margin-bottom` and `margin-left`, you can use `margin-block-start`, `margin-inline-end`, `margin-block-end` and `margin-inline-start`.

### Negative margin

Negative values can also be used for margin.
Instead of adding space between adjacent sibling elements,
it will **reduce space** between them.
This can result in overlapping elements,
if you declare a negative value that's more than the available space.
<iframe allow="camera; clipboard-read; clipboard-write; encrypted-media; geolocation; microphone; midi;" loading="lazy" src="https://codepen.io/web-dot-dev/embed/YzNQeLP?height=500&amp;theme-id=light&amp;default-tab=result&amp;editable=true" style="height: 100%; width: 100%; border: 0;" title="Pen YzNQeLP by web-dot-dev on Codepen"></iframe>

### Margin collapse

Margin collapse is a tricky concept,
but it's something you'll run into very commonly when building interfaces.
Say you have two elements: a heading and a paragraph that both have vertical margin on them:

    <article>
      <h1>My heading with teal margin</h1>
      <p>A paragraph of text that has blue margin on it, following the heading with margin.</p>
    </article>

    h1 {
        margin-bottom: 2rem;
    }

    p {
        margin-top: 3rem;
    }

<iframe allow="camera; clipboard-read; clipboard-write; encrypted-media; geolocation; microphone; midi;" loading="lazy" src="https://codepen.io/web-dot-dev/embed/OJWgvMx?height=500&amp;theme-id=light&amp;default-tab=result&amp;editable=true" style="height: 100%; width: 100%; border: 0;" title="Pen OJWgvMx by web-dot-dev on Codepen"></iframe>

At first glance,
you would be forgiven for thinking that the paragraph will be spaced `5em` from the heading,
because `2rem` and `3rem` combined calculate to `5rem`.
Because **vertical margin collapses** , though, the space is actually `3rem`.

Margin collapse works by selecting the largest value of two adjoining elements
with vertical margin set on the adjoining sides.
The bottom of the `h1` meets the top of the `p`,
so the largest value of the `h1`'s bottom margin and the `p`'s top margin is selected.
If the `h1` were to have `3.5rem` of bottom margin,
the space between them both would then be `3.5rem` because that is larger than `3rem`.
Only block margins collapse, not inline (horizontal) margins.

> [!NOTE]
> **Note:** This behavior is rooted back to when the web was mostly just documents. Collapsing margins help to set consistent spacing between elements without accidentally creating huge gaps between elements that also have margin defined.

Margin collapse also helps with empty elements.
If you have a paragraph that has a top and bottom margin of `20px`,
it will only create `20px` of space: not `40px`.
If *anything* is added to the inside of this element though,
including `padding`, its margin will no longer collapse in itself and will be treated as any box with content.

### Check your understanding

Test your knowledge of margin collapsing
If two elements stacked on top of each other both have 20px of top margin
and 30px of bottom margin, how much space will there be between them?
10px Try again! 20px Not quite 30px CSS will take the larger of the margin spaces between elements yep! 40px Try again!

#### Preventing margin collapse

If you make an element absolutely positioned,
using `position: absolute`, the margin will no longer collapse.
The margin also won't collapse if you use the `float` property, too.

If you have an element with no margin between two elements with block margin,
the margin won't collapse either,
because the two elements with block margin are no longer adjacent siblings: they are just siblings.
<iframe allow="camera; clipboard-read; clipboard-write; encrypted-media; geolocation; microphone; midi;" loading="lazy" src="https://codepen.io/web-dot-dev/embed/YzNQavQ?height=500&amp;theme-id=light&amp;default-tab=result&amp;editable=true" style="height: 100%; width: 100%; border: 0;" title="Pen YzNQavQ by web-dot-dev on Codepen"></iframe>

In the [layout lesson](https://web.dev/learn/css/layout),
you learned that flexbox and grid containers are very similar to block containers,
but handle their child elements very differently.
This is the case with margin collapse, too.

If we take the original example from the lesson and apply flexbox with column direction,
the margins are combined,
instead of collapsed.
This can provide predictability with layout work,
which is what flexbox and grid containers are designed for.
<iframe allow="camera; clipboard-read; clipboard-write; encrypted-media; geolocation; microphone; midi;" loading="lazy" src="https://codepen.io/web-dot-dev/embed/QWdgmNx?height=500&amp;theme-id=light&amp;default-tab=result&amp;editable=true" style="height: 100%; width: 100%; border: 0;" title="Pen QWdgmNx by web-dot-dev on Codepen"></iframe>

Margin and margin collapse can be tricky to understand,
but understanding how they work, in detail, is very useful,
so [this detailed explainer](https://www.smashingmagazine.com/2019/07/margins-in-css)
is strongly recommended.

## Padding

Instead of creating space on the outside of your box,
like `margin` does,
the `padding` property creates space on the **inside** of your box instead:
like insulation.

![A box with arrows pointing inwards to show that padding lives inside a box](https://web.dev/static/learn/css/spacing/image/a-box-arrows-pointing-in-2872ab772a788.png)

Depending on which box model you are using---which was covered back in the
[box model lesson](https://web.dev/learn/css/box-model)
---`padding` can also affect the overall dimensions of the element too.
<iframe allow="camera; clipboard-read; clipboard-write; encrypted-media; geolocation; microphone; midi;" loading="lazy" src="https://codepen.io/web-dot-dev/embed/eYgRrzz?height=500&amp;theme-id=light&amp;default-tab=result&amp;editable=true" style="height: 100%; width: 100%; border: 0;" title="Pen eYgRrzz by web-dot-dev on Codepen"></iframe>

The `padding` property is shorthand for `padding-top`, `padding-right`, `padding-bottom` and `padding-left`.
Just like `margin`, `padding` has logical properties, too:
`padding-block-start`, `padding-inline-end`, `padding-block-end` and `padding-inline-start`.

## Positioning

Also covered in the [layout](https://web.dev/learn/css/layout) module,
if you set a value for `position` that is anything other than `static`,
you can space elements with the `top`, `right`, `bottom` and `left` properties.
There are some differences with how these directional values behave:

- An element with `position: relative` will maintain its place in the document flow, even when you set these values. They will be relative to your element's position too.
- An element with `position: absolute` will base the directional values from the relative parent's position.
- An element with `position: fixed` will base the directional values on the viewport.
- An element with `position: sticky` will only apply the directional values when it is in its docked/stuck state.

<iframe allow="camera; clipboard-read; clipboard-write; encrypted-media; geolocation; microphone; midi;" loading="lazy" src="https://codepen.io/web-dot-dev/embed/NWdNGZB?height=500&amp;theme-id=light&amp;default-tab=result&amp;editable=true" style="height: 100%; width: 100%; border: 0;" title="Pen NWdNGZB by web-dot-dev on Codepen"></iframe>

In the [logical properties](https://web.dev/learn/css/logical-properties) module,
you learn about the `inset-block` and `inset-inline` properties,
which allow you to set directional values that honor writing mode.

Both properties are shorthands combining the `start` and `end` values
and as such accept either one value to be set for `start` and `end` or
two individual values.

## Grid and flexbox

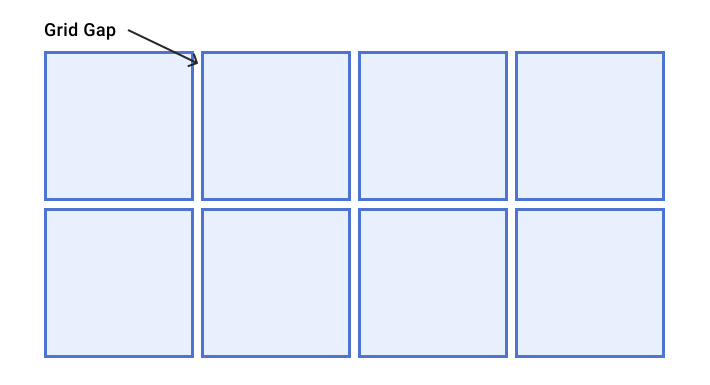
Lastly, in both grid and flexbox you can use the `gap` property to create space *between* child elements.
The `gap` property is shorthand for `row-gap` and `column-gap`,
it accepts one or two values, which can be lengths or percentages.
You can also use keywords such as `unset`, `initial` and `inherit`.
If you define only one value,
the same `gap` will be applied to both the rows and columns,
but if you define both values,
the first value is `row-gap` and the second value is `column-gap`.

With both flexbox and grid, you can also create space using their distribution and alignment capabilities,
which we cover in the
[grid module](https://web.dev/learn/css/grid) and
[flexbox module](https://web.dev/learn/css/flexbox).
![A diagram representation of a grid with gaps](https://web.dev/static/learn/css/spacing/image/a-diagram-representation-5f42dbf13f58c.svg)

## Creating consistent spacing

It is a really good idea to choose a strategy and stick with it
to help you create a consistent user interface that has good flow and rhythm.
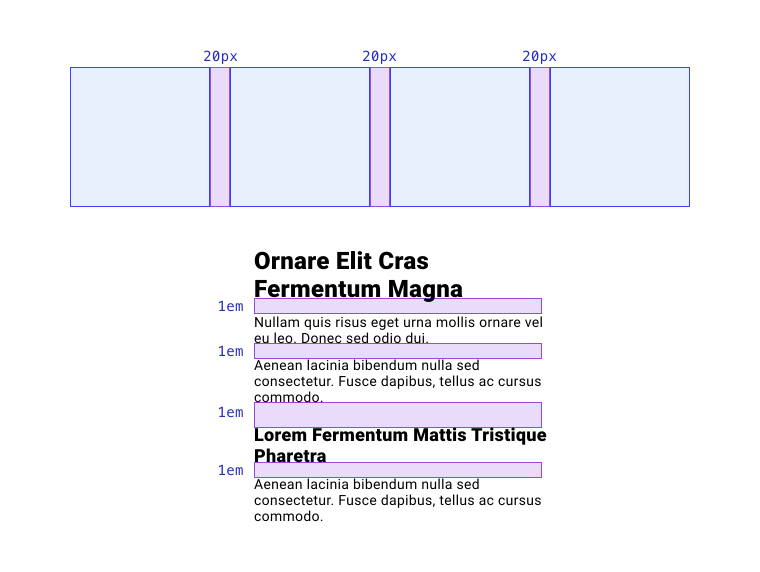
A good way to achieve this is use consistent measures for your spacing.

For example, you could commit to using `20px`
as a consistent measure for all gaps between elements---known as gutters---so
all layouts look and feel consistent.
You could also decide to use `1em` as the vertical spacing between flow content,
which would achieve consistent spacing based on the element's `font-size`.
Whatever you choose,
you should save these values as variables (or CSS custom properties)
to tokenize those values and make the consistency a bit easier.
![Consistent spacing between elements,
using either 20px for a layout or 1em for flow content.](https://web.dev/static/learn/css/spacing/image/consistent-spacing-betwee-eb88766a9292e.svg)

    :root {
      --gutter: 20px;
      --spacing: 1em;
    }

    h1 {
      margin-left: var(--gutter);
      margin-top: var(--spacing);
    }

Using custom properties like this allows you to define them once,
then use them throughout your CSS.
When they are updated,
either locally within an element or globally,
the values will pass down through the cascade and the updated values will be reflected.

### Check your understanding

Test your knowledge of spacing
It's safe to use HTML for spacing when...
It's only one. Try again! No one will notice. Try again! It's just for space. Try again! It helps with the understanding of the document. You got it! To create space **inside** a box, use...
Margin Margin is for pushing outside of a box. HTML These are for spacing and dividing content. Gap Gap is for spacing between boxes. Padding Padding is for creating space inside of a box. To create space **outside** a box, use...
Margin Margin is for pushing outside of a box. HTML These are for spacing and dividing content. Gap Gap is for spacing between boxes. Padding Padding is for creating space inside of a box. To create space **between** boxes, use...
Margin Margin is for pushing outside of a box. HTML These are for spacing and dividing content. Gap Gap is for spacing between boxes. Padding Padding is for creating space inside of a box.